Creating a registration form

You can create a registration form in either the My Events (for events) or My Members (for clubs & organizations) sections. While the process of creating a registration form is similar in both sections, having two separate areas to create forms makes it easier to organize them.

If you want to create a new registration form, just follow these simple steps:

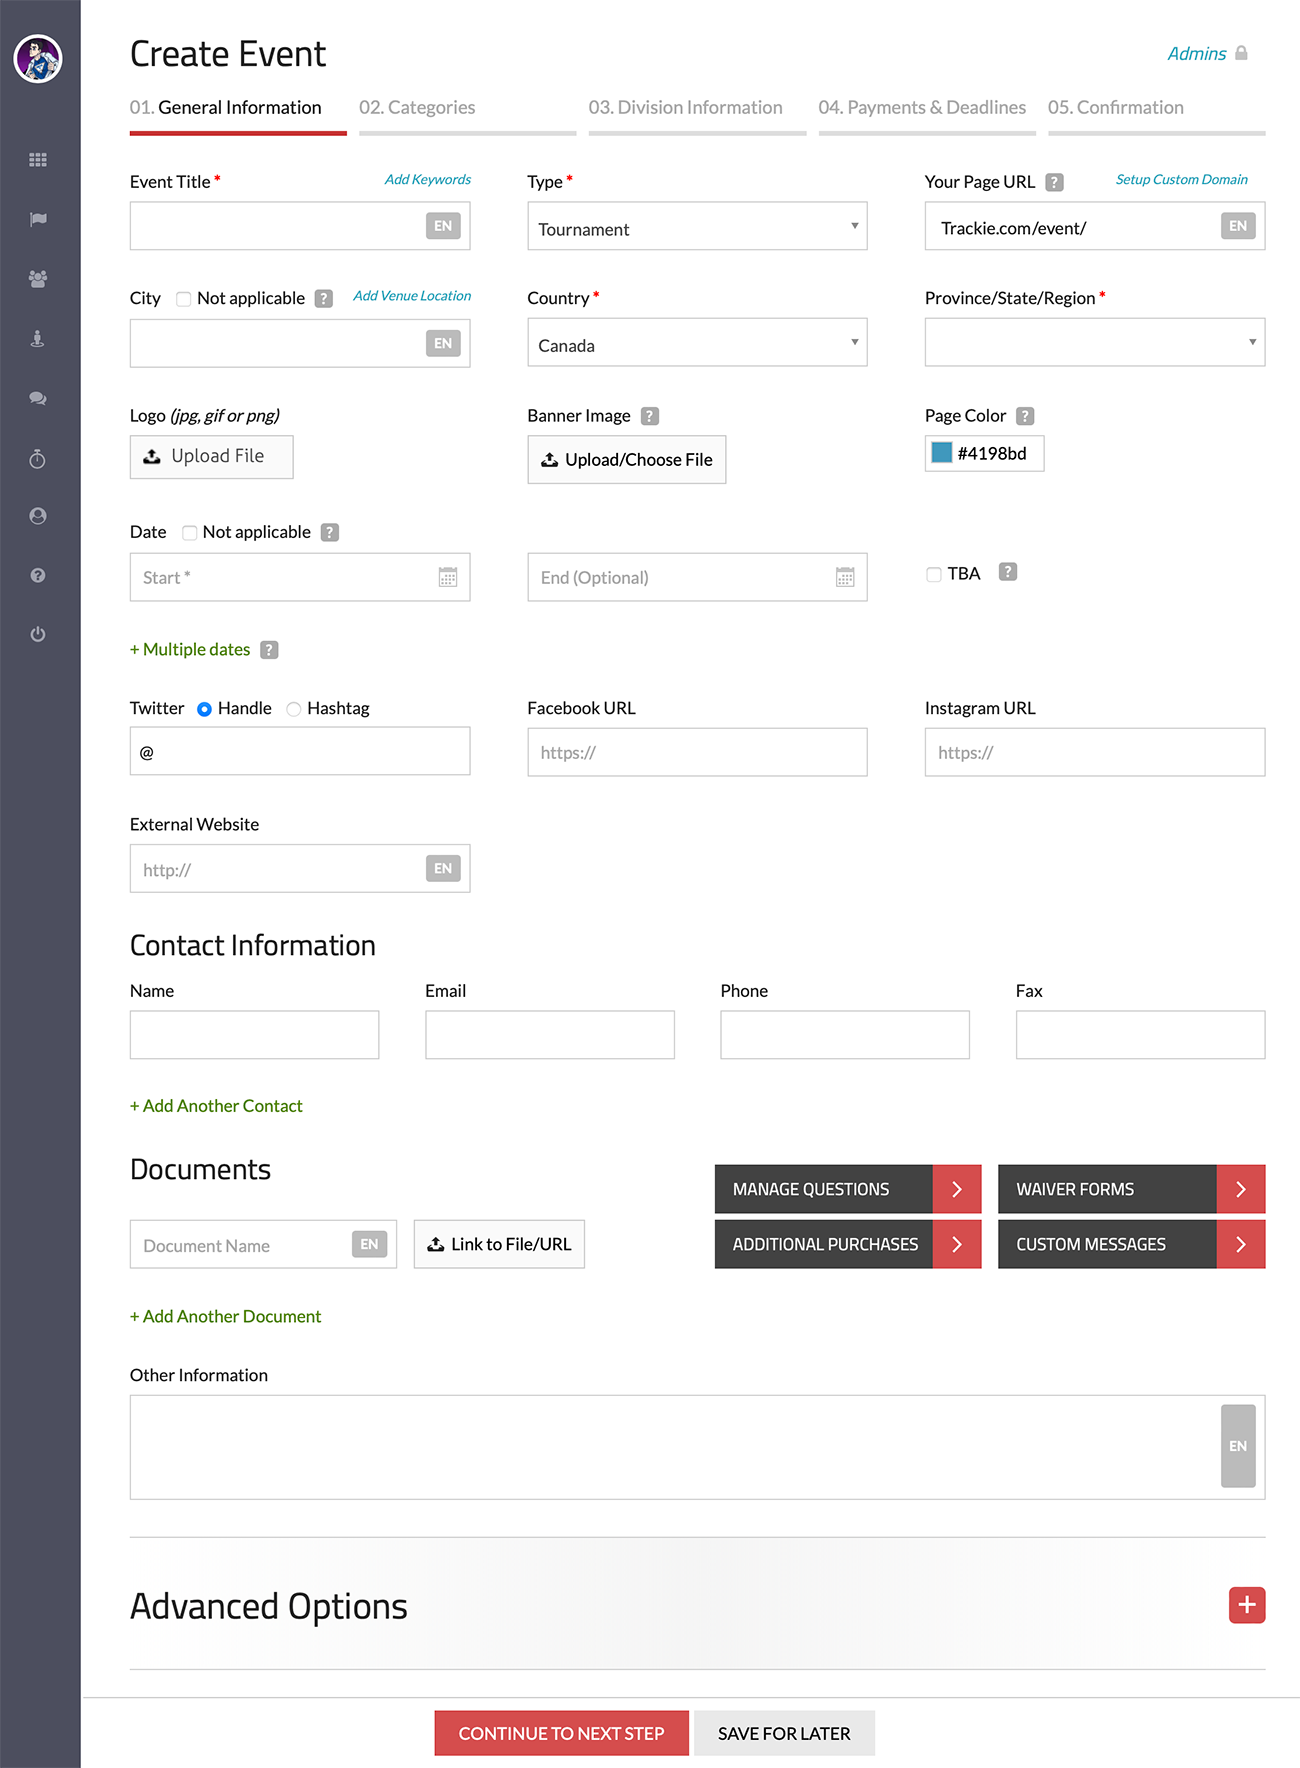
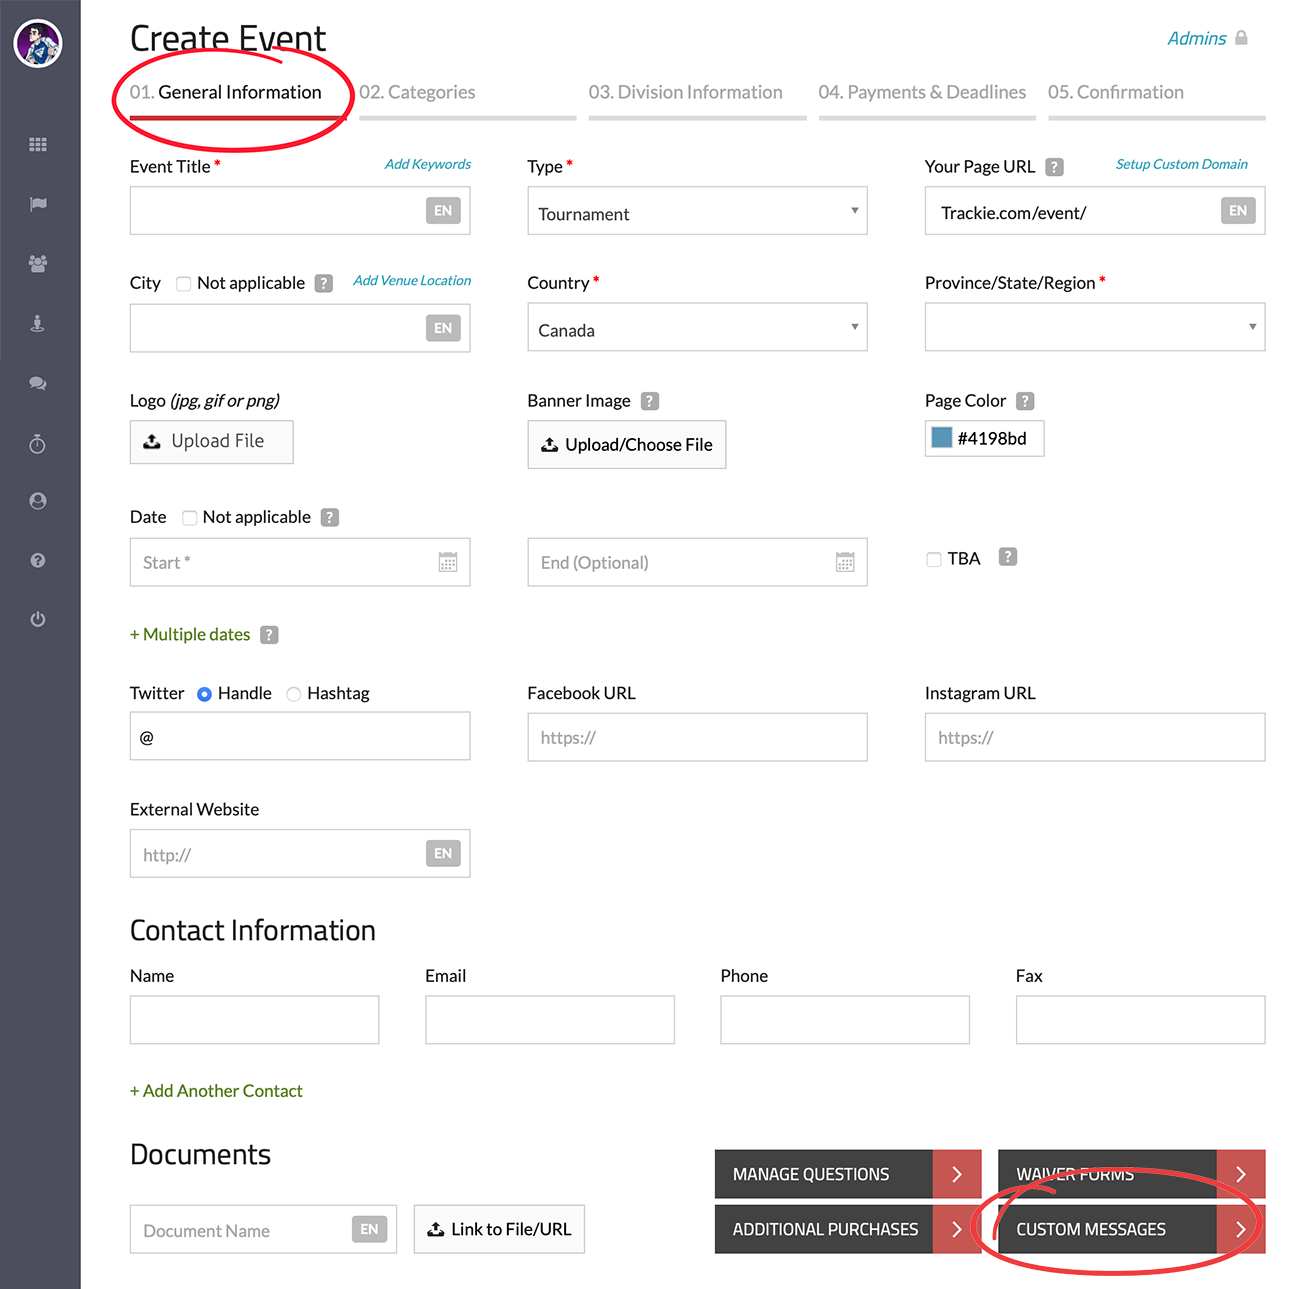
  1. Go to either the My Events or My Members section of the site.
  2. Look for the green "CREATE EVENT" button at the top of the page. If you're in the "My Members" section, it will say "CREATE PAGE" instead.
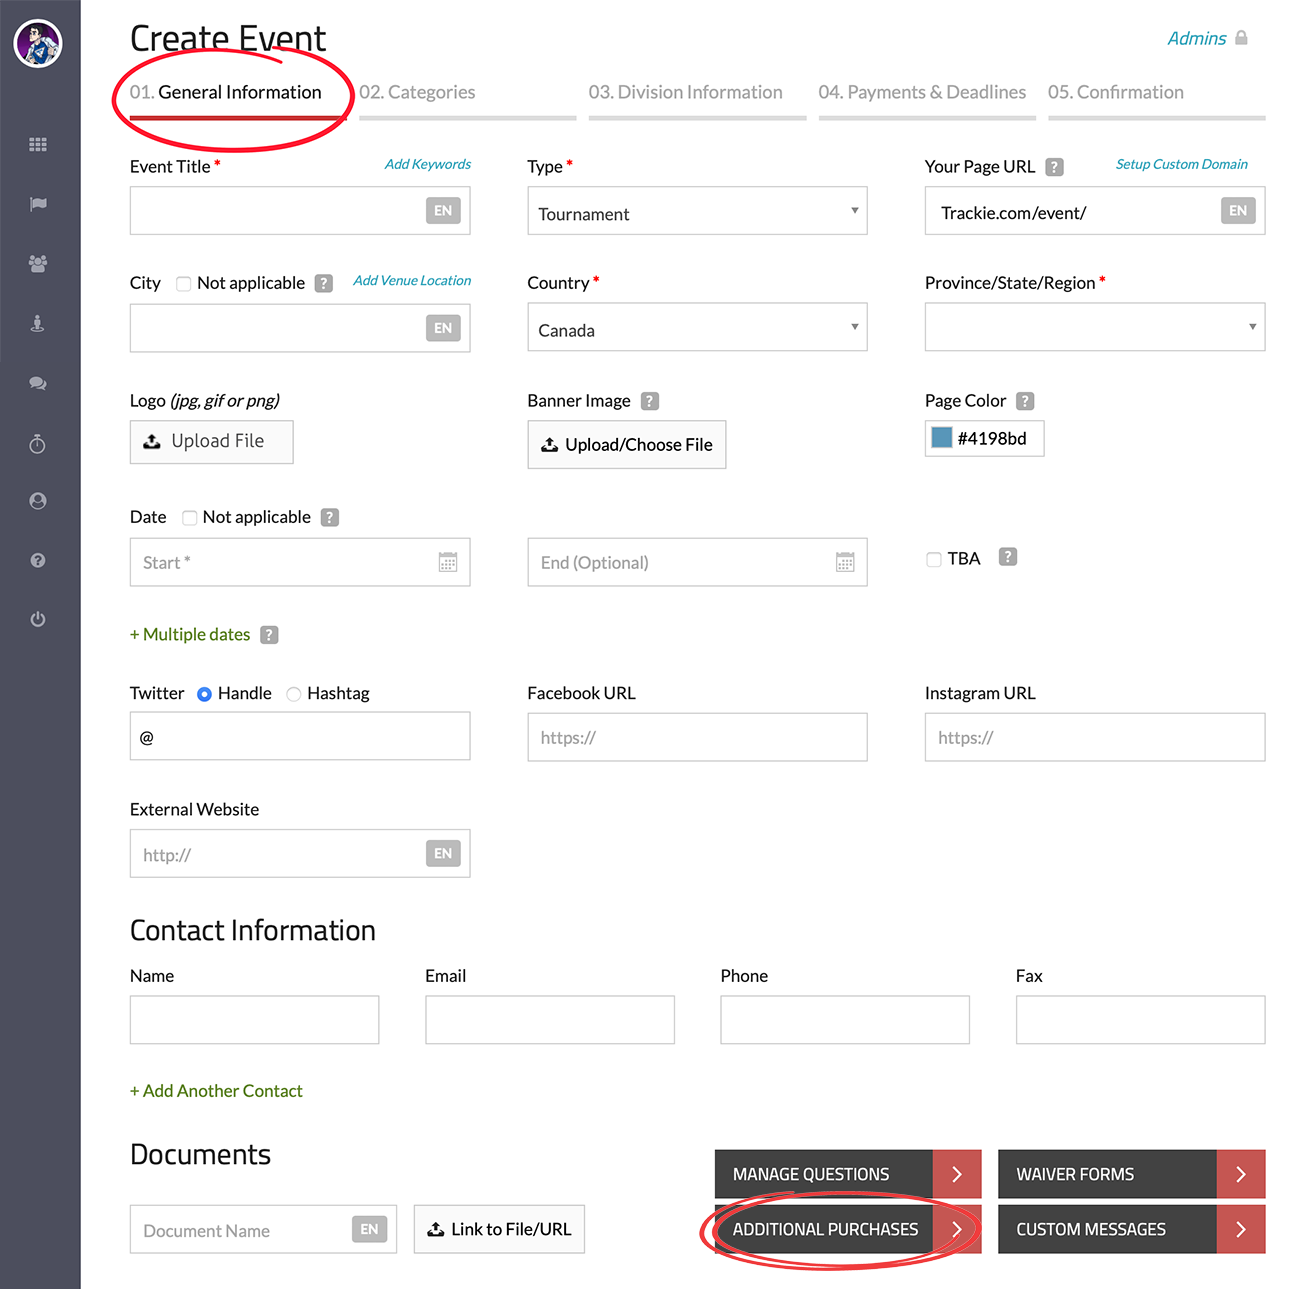
  3. Click the button and fill out all of the required fields under "01: General Information". There are also plenty of optional settings that you can take advantage of if needed.
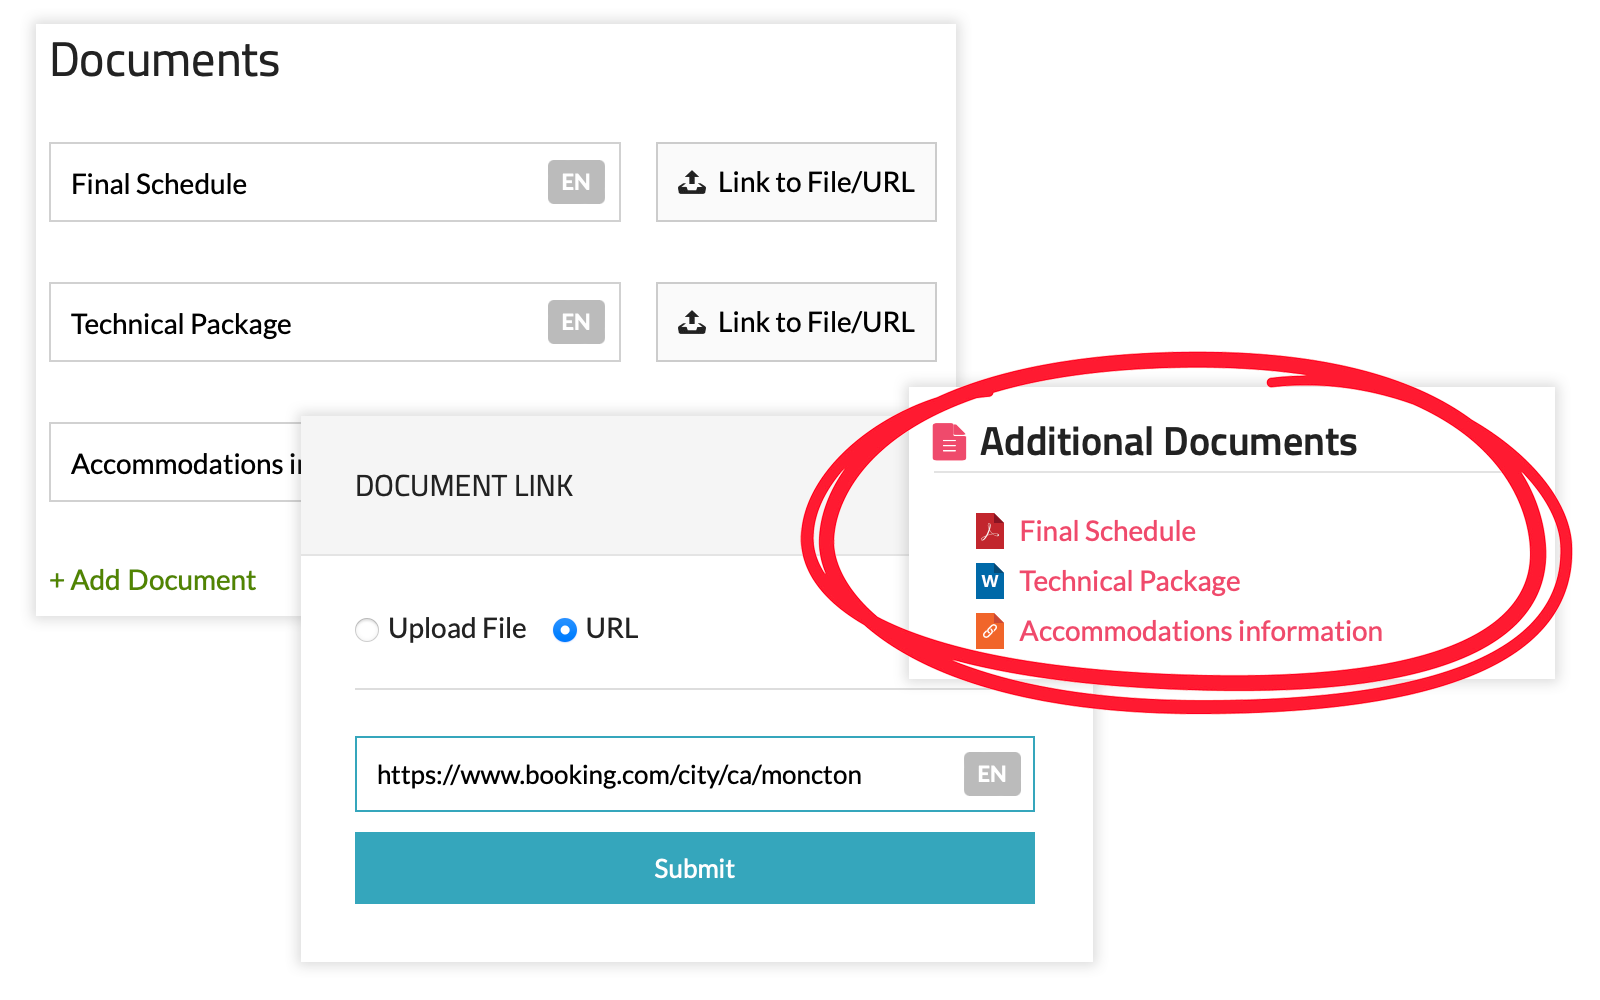
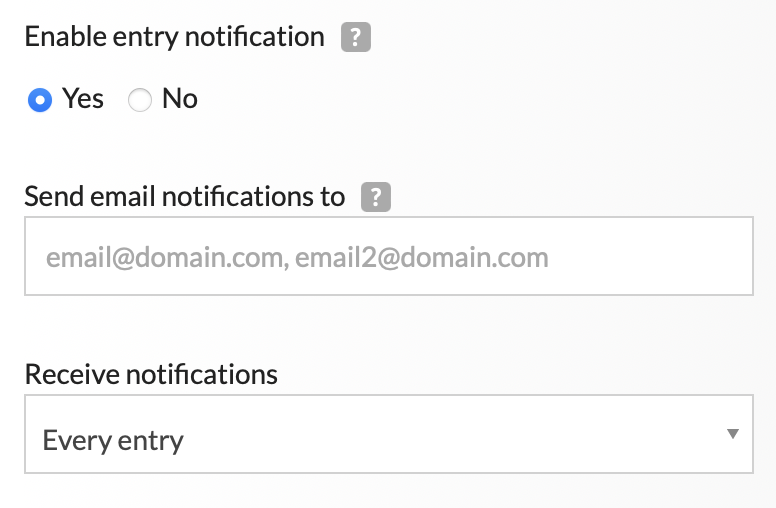
    (+) Click here to show detailed information about each setting.
  4. After you've provided all of the required information under "01: General Information", simply click on the "CONTINUE TO NEXT STEP" button to proceed to the next step.
  5. Each of the remaining steps enable you to further customize your registration form. There is a dedicated section for each step in our Knowledge Base, where you can learn more.

    02: Categories: In this section, you can create various categories with age restrictions. Learn more

    03: Division: In this section, you can create specific events/divisions (such as 100m, 200m, long jump, etc.) or membership types (such as athlete, coach, official, associate, etc.). Learn more

    04: Payments & Deadlines: In this section, you can specify both the registration deadlines and costs. Learn more

    05: Confirmation: This section provides you with an overview of all your settings.

Editing previously created forms

These simple steps will guide you on how to edit a registration form that you've created previously.

  1. To log into your account, use this link: registration.judocanada.org/login/.
  2. Navigate to either the My Events or My Members section, depending on where you originally created it.
  3. Click the "Options" button and then choose "Edit Settings".


You can also find a link to edit your settings at the top of the "View Registrants" section.


Last updated: May 28th, 2023
 

At the core of every registration form are questions! Our system allows you to ask as many questions as necessary to your registrants. This section will provide guidance on managing the questions and waiver forms that show up on your registration form.

Note

The interface for both "Manage Questions" and "Waiver Forms" is very similar, and the information provided below applies to both, unless specified otherwise.

To access the settings for managing your questions/waiver forms, you need to first create a registration form. You can find these settings under "Step 1: General Information" by clicking on either the "Manage Questions" or "Waiver Forms" buttons.


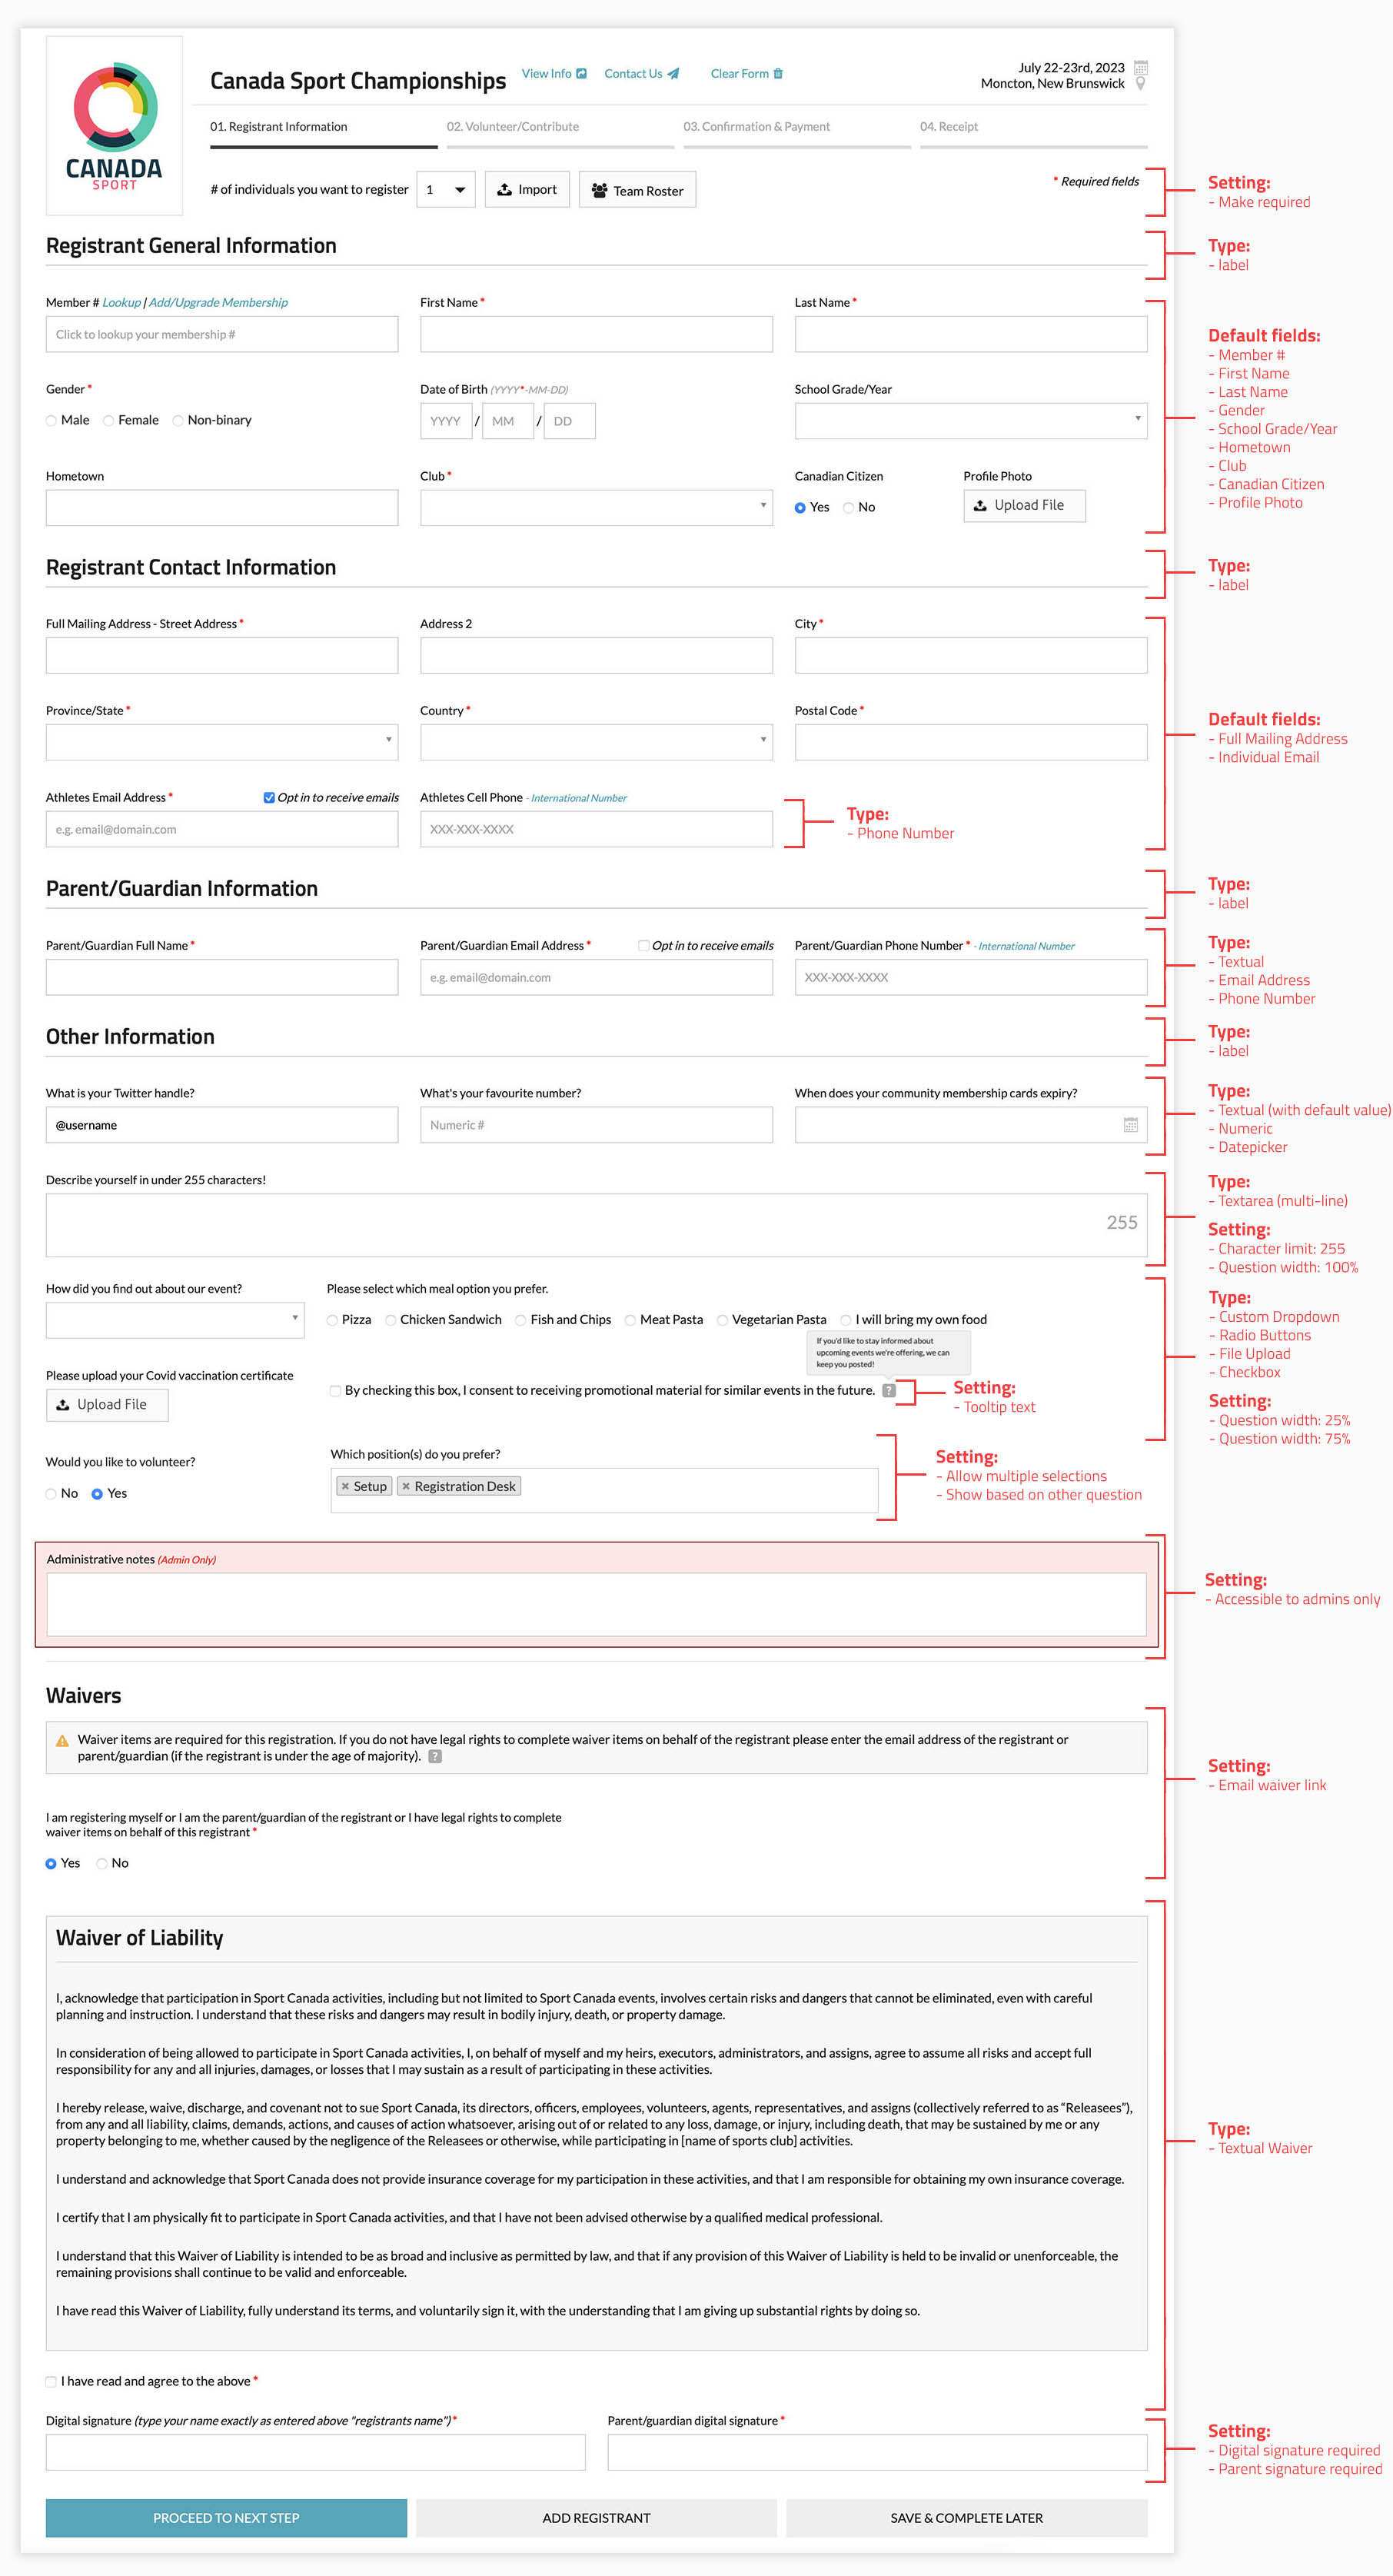
Below is what the interface to manage your questions (or waiver forms) looks like.

1. Add Question
To add more questions to your registration form, click the "Add Question" button.


2. Ordering Questions
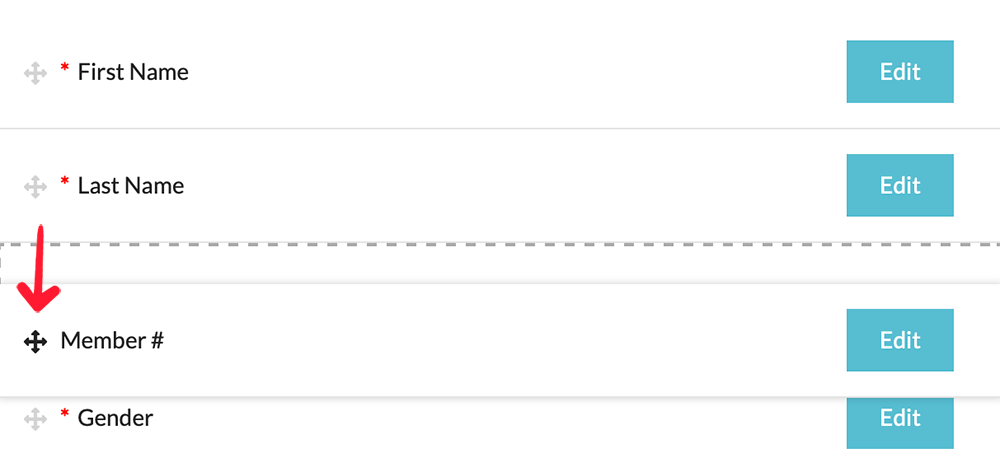
The order of the questions on your registration form is determined by the order in which they appear in this pop-up. To rearrange the questions, click and drag the "4 arrow" icon to move questions up or down.


3. Edit
To edit or delete a question, click on the "Edit" button to access the question settings.


4. Show default field settings
* Available in "manage questions" section only.
Our system provides default fields such as Member #, Name, Gender, and more. You have the option to use these default fields or create your own questions (in most cases use a combination of both).

4. (continued)
Under the "waiver forms" section, you can specify whether a digital signature, a parent signature (if the registrant is a minor), or both are required, as well as whether you want to email the waiver directly to the registrant and/or parent. This feature can be particularly useful in situations where a coach registers multiple athletes but lacks legal authority to complete waivers for each of them.


5. Save
Once you have finished making changes, click the "Save" button to save your modifications.

 
(+) Click here to show detailed information about each setting.


Last updated: May 28th, 2023
 

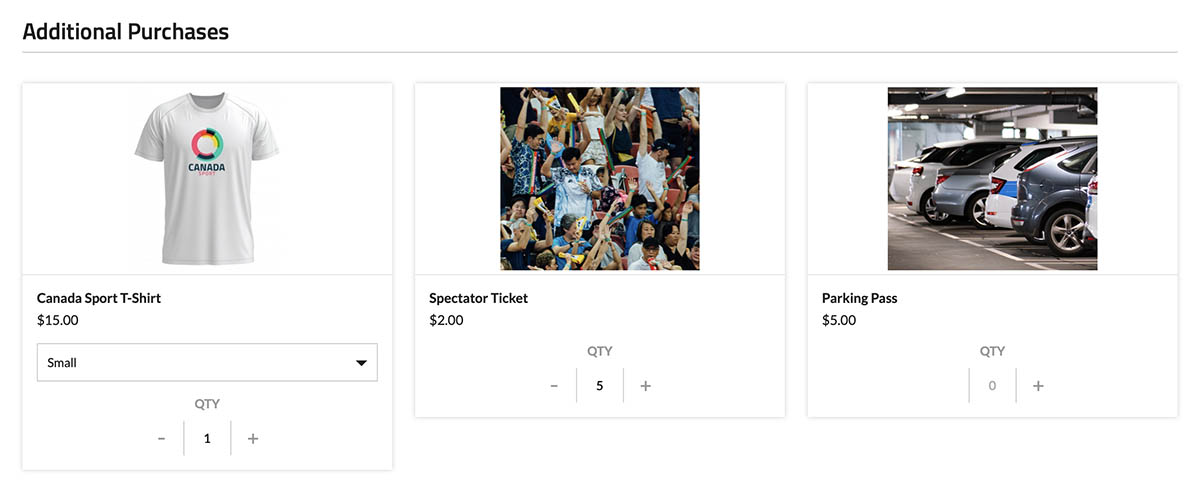
Our system provides you the ability to offer additional items for sale alongside your registration form, such as event t-shirts, spectator tickets, parking passes, and more.

To access the settings for managing your additional purchases, you need to first create a registration form. You can find these settings under "Step 1: General Information" by clicking on the "Additional Purchases" button.


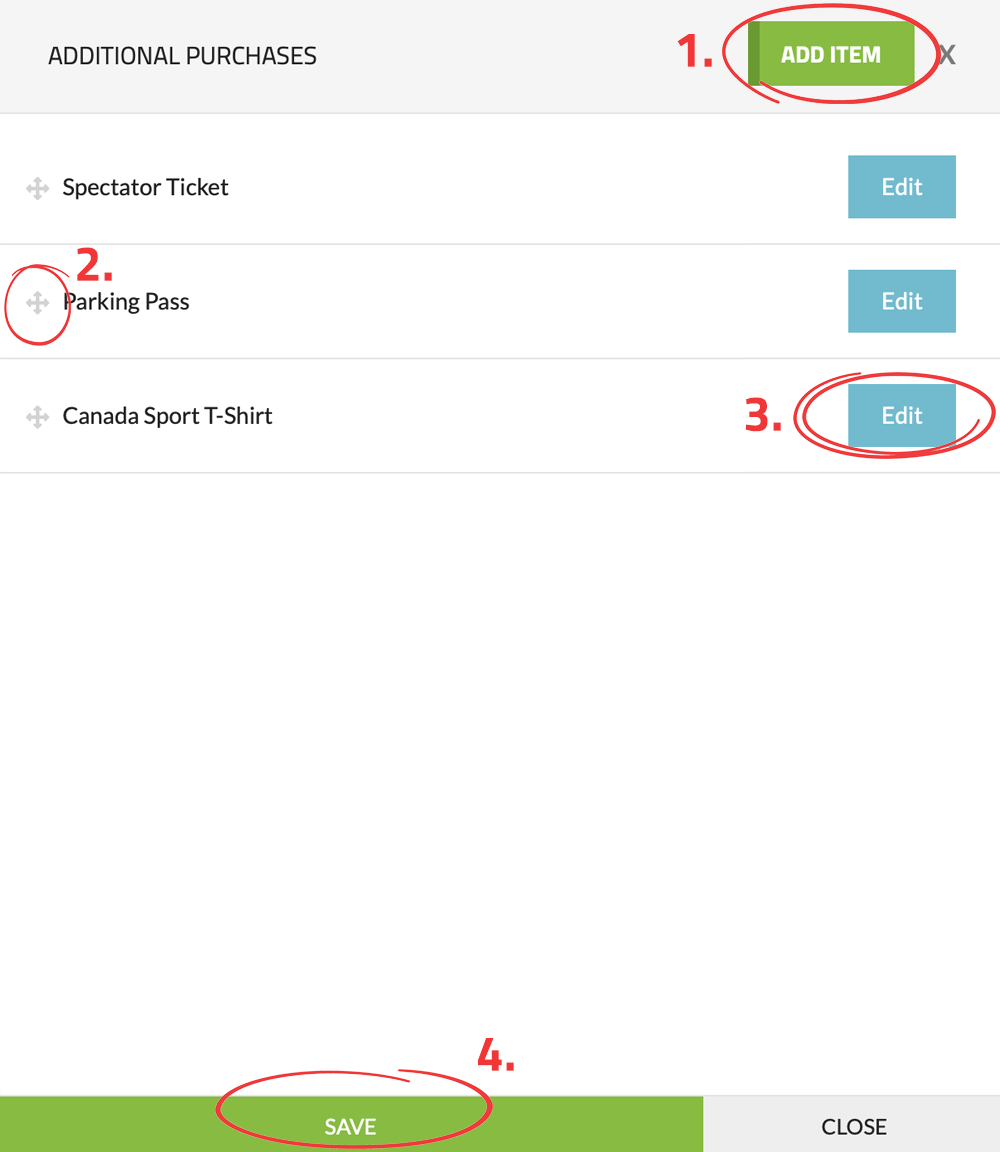
Below is what the interface to manage your additional purchases looks like.

1. Add Item
To add more items for purchase, click the "Add Item" button.


2. Ordering Items
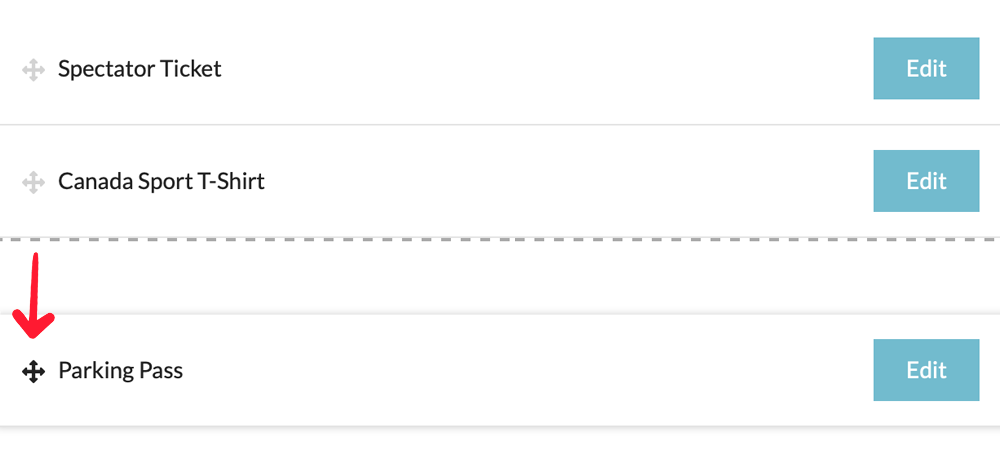
The order of the item on your registration form is determined by the order in which they appear in this pop-up. To rearrange the items, click and drag the "4 arrow" icon to move up or down.


3. Edit
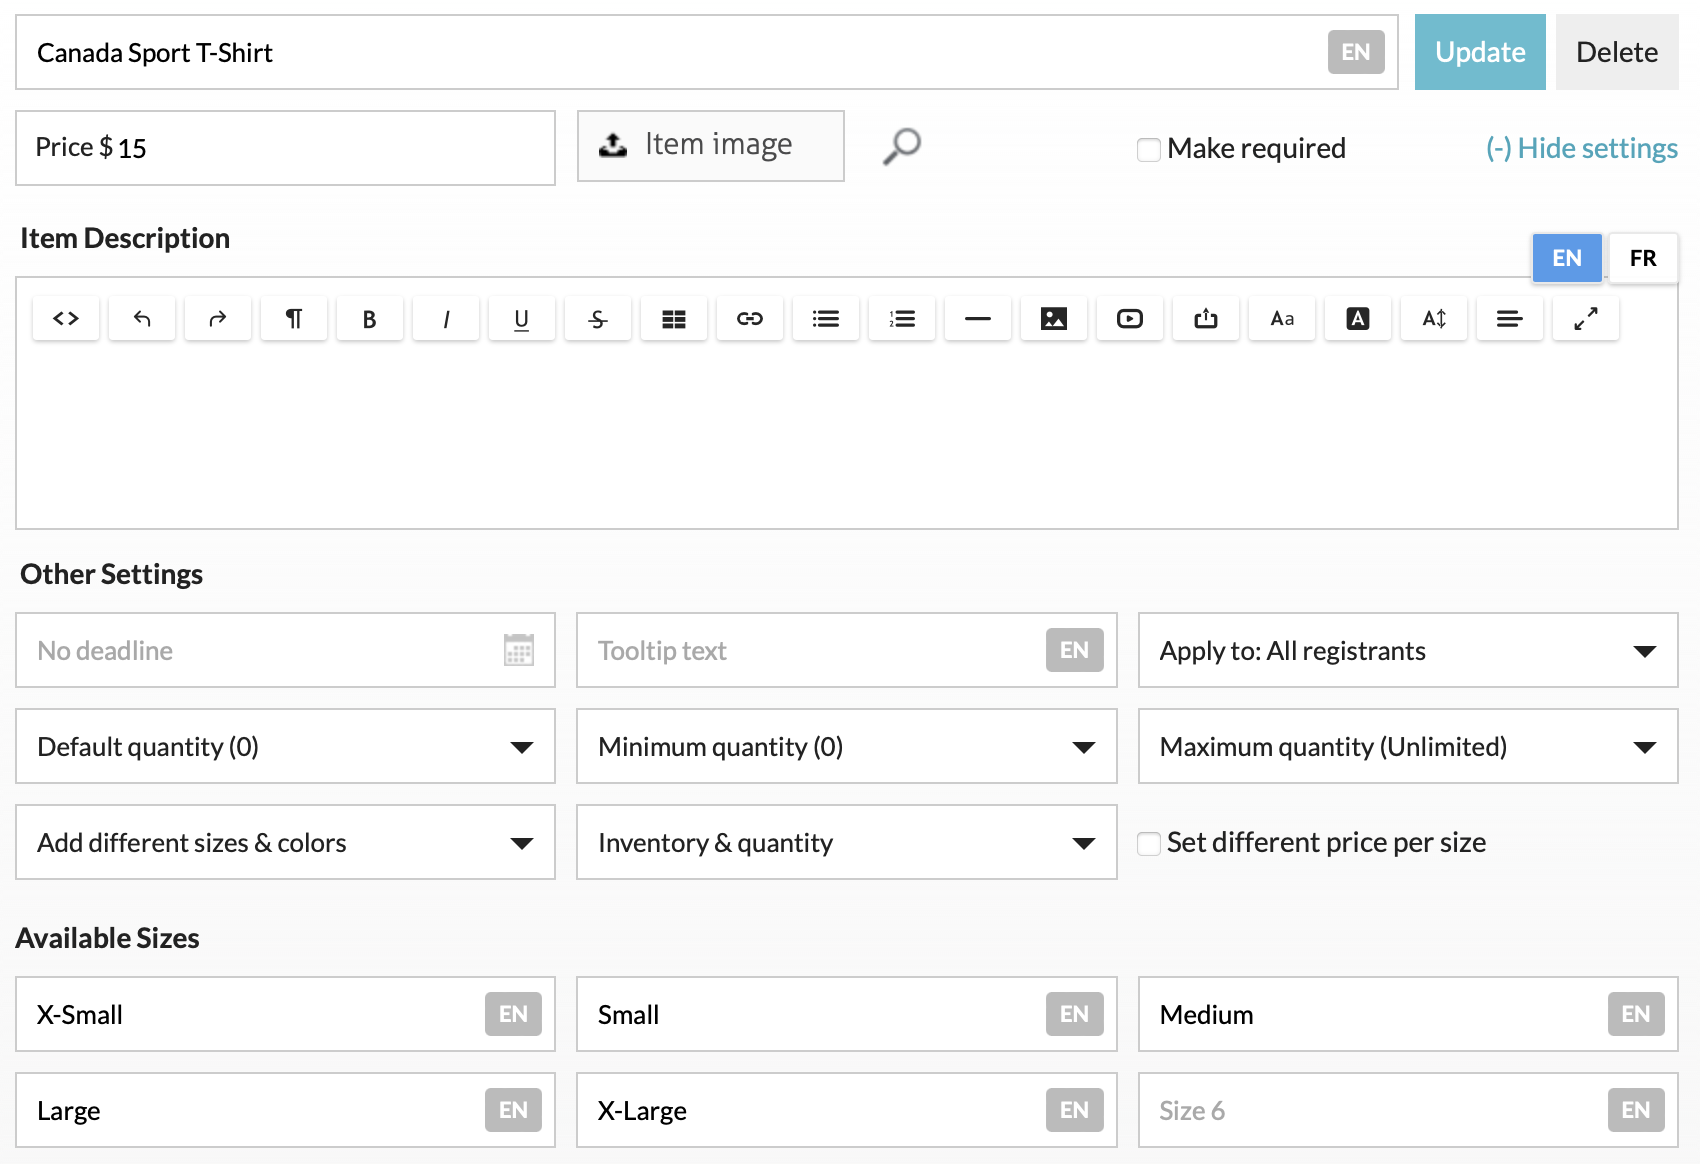
To edit or delete an item, click on the "Edit" button to access the question settings.


4. Save
Once you have finished making changes, click the "Save" button to save your modifications.

 
To view detailed information about each setting, click here.


Last updated: May 28th, 2023
 

With our system, you can easily add your own text to several important places.

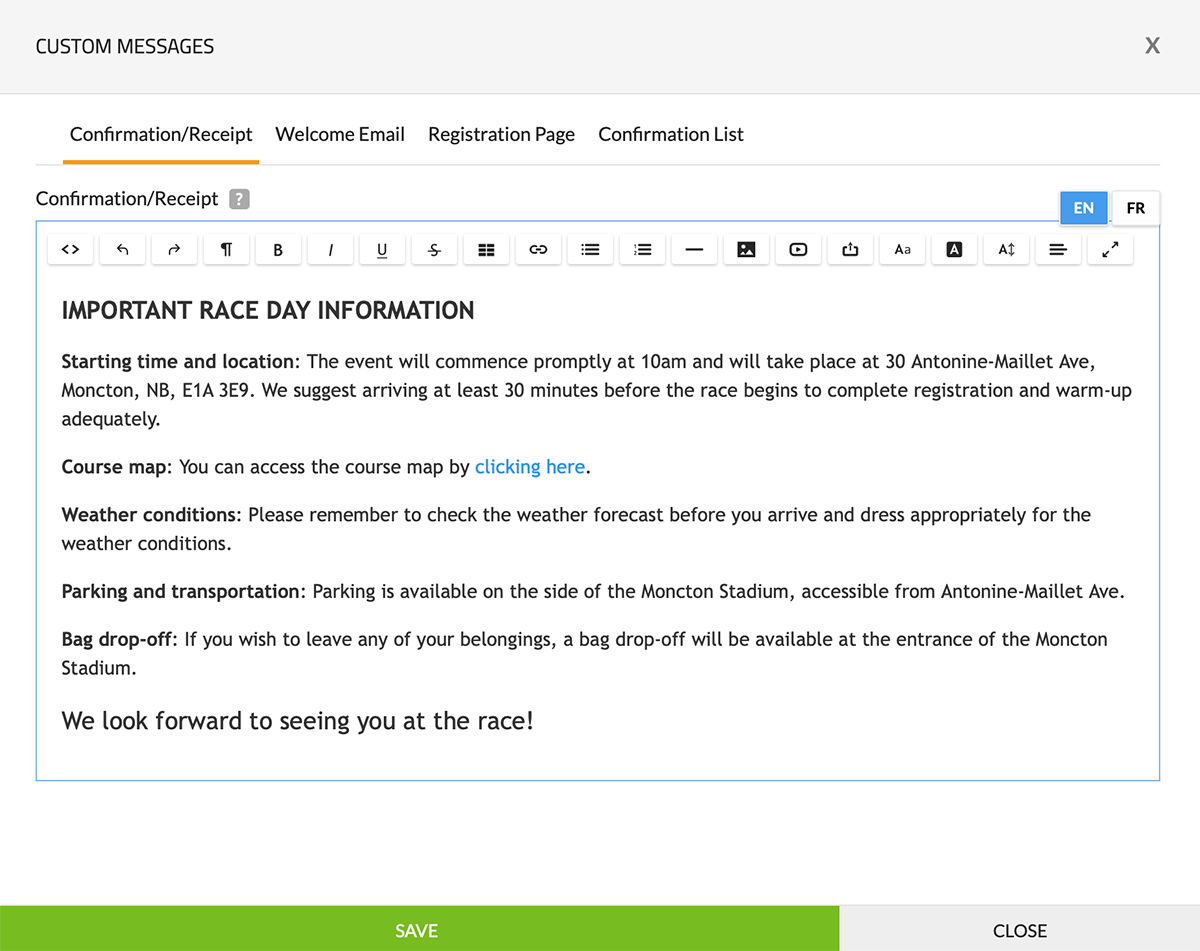
To access the settings for custom messages, you need to first create a registration form. You can find these settings under "Step 1: General Information" by clicking on the "Custom Messages" button.


Below is what the interface to manage your custom messages looks like.

With our system, you can add custom messages to four key locations:

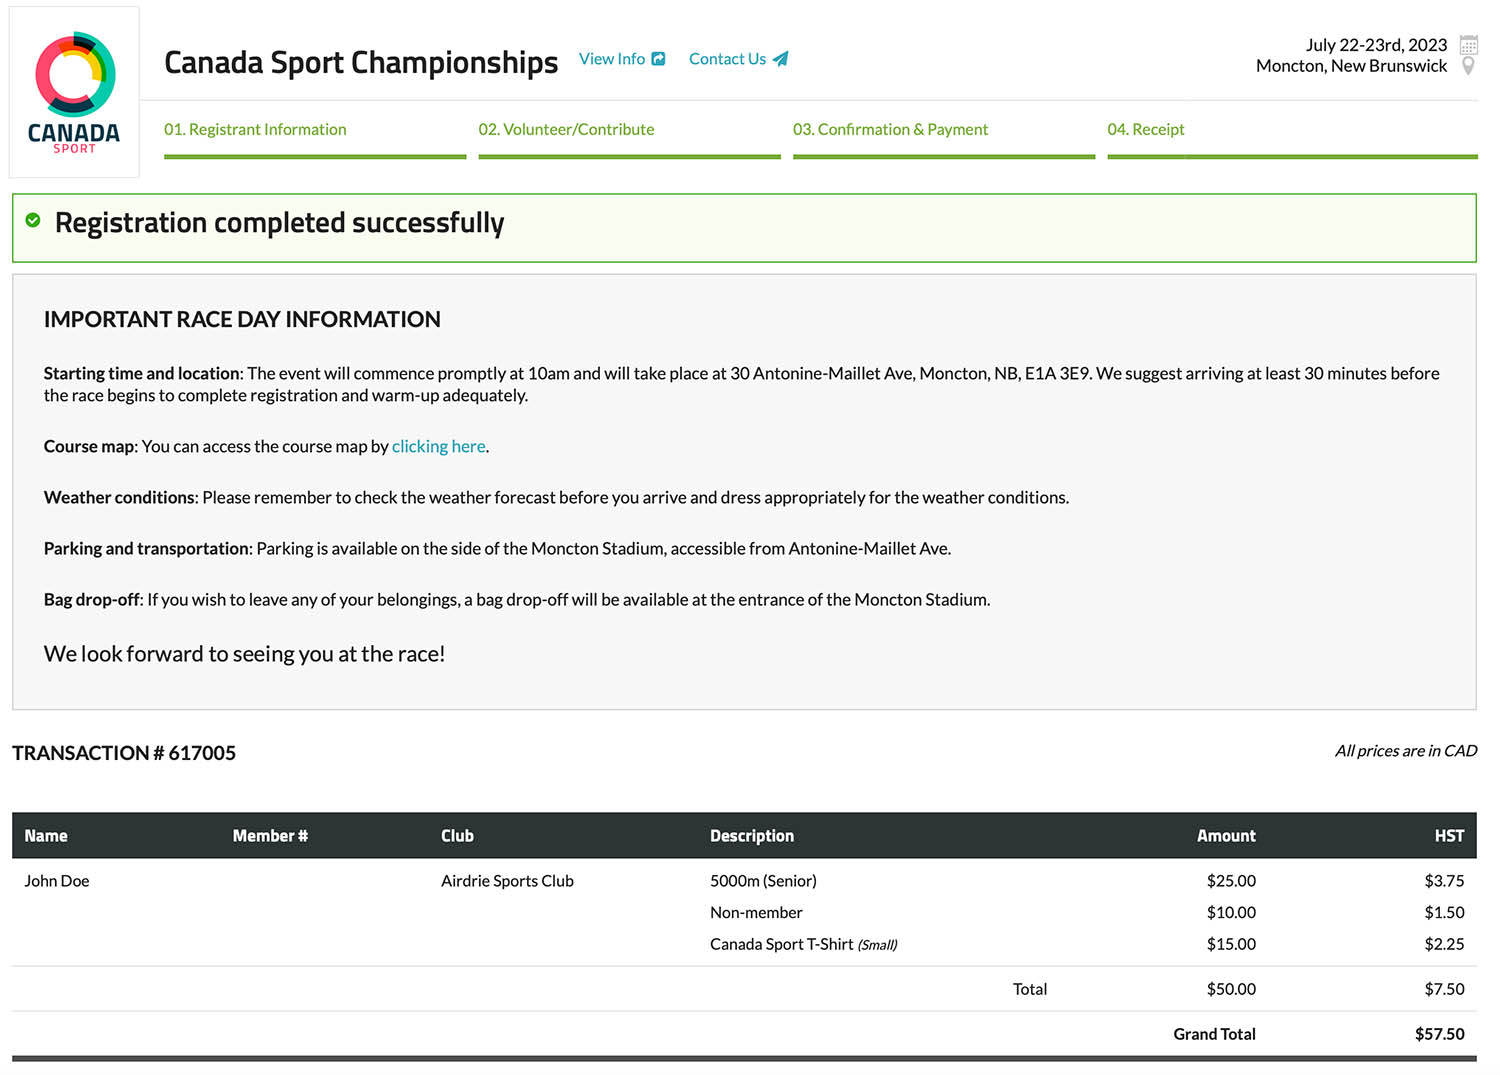
  1. Confirmation/Receipt: Once registration is complete, the registrant will land on this page, and a receipt will be sent to the billing email address.
  2. Welcome Email: You can choose to send a separate email to each registrant upon completion of their registration, in addition to the receipt.
  3. Registration Page: Place some text at the top of your page's registration form.
  4. Confirmation List: Place some text at the top of your page's public confirmation list.

Below is an example of text that has been added to the confirmation/receipt page.


Last updated: May 28th, 2023
 

When you set up your registration form, our system allows you to create multiple categories. You can customize the names of these categories, and for each category, you can set specific minimum and maximum age requirements if needed.

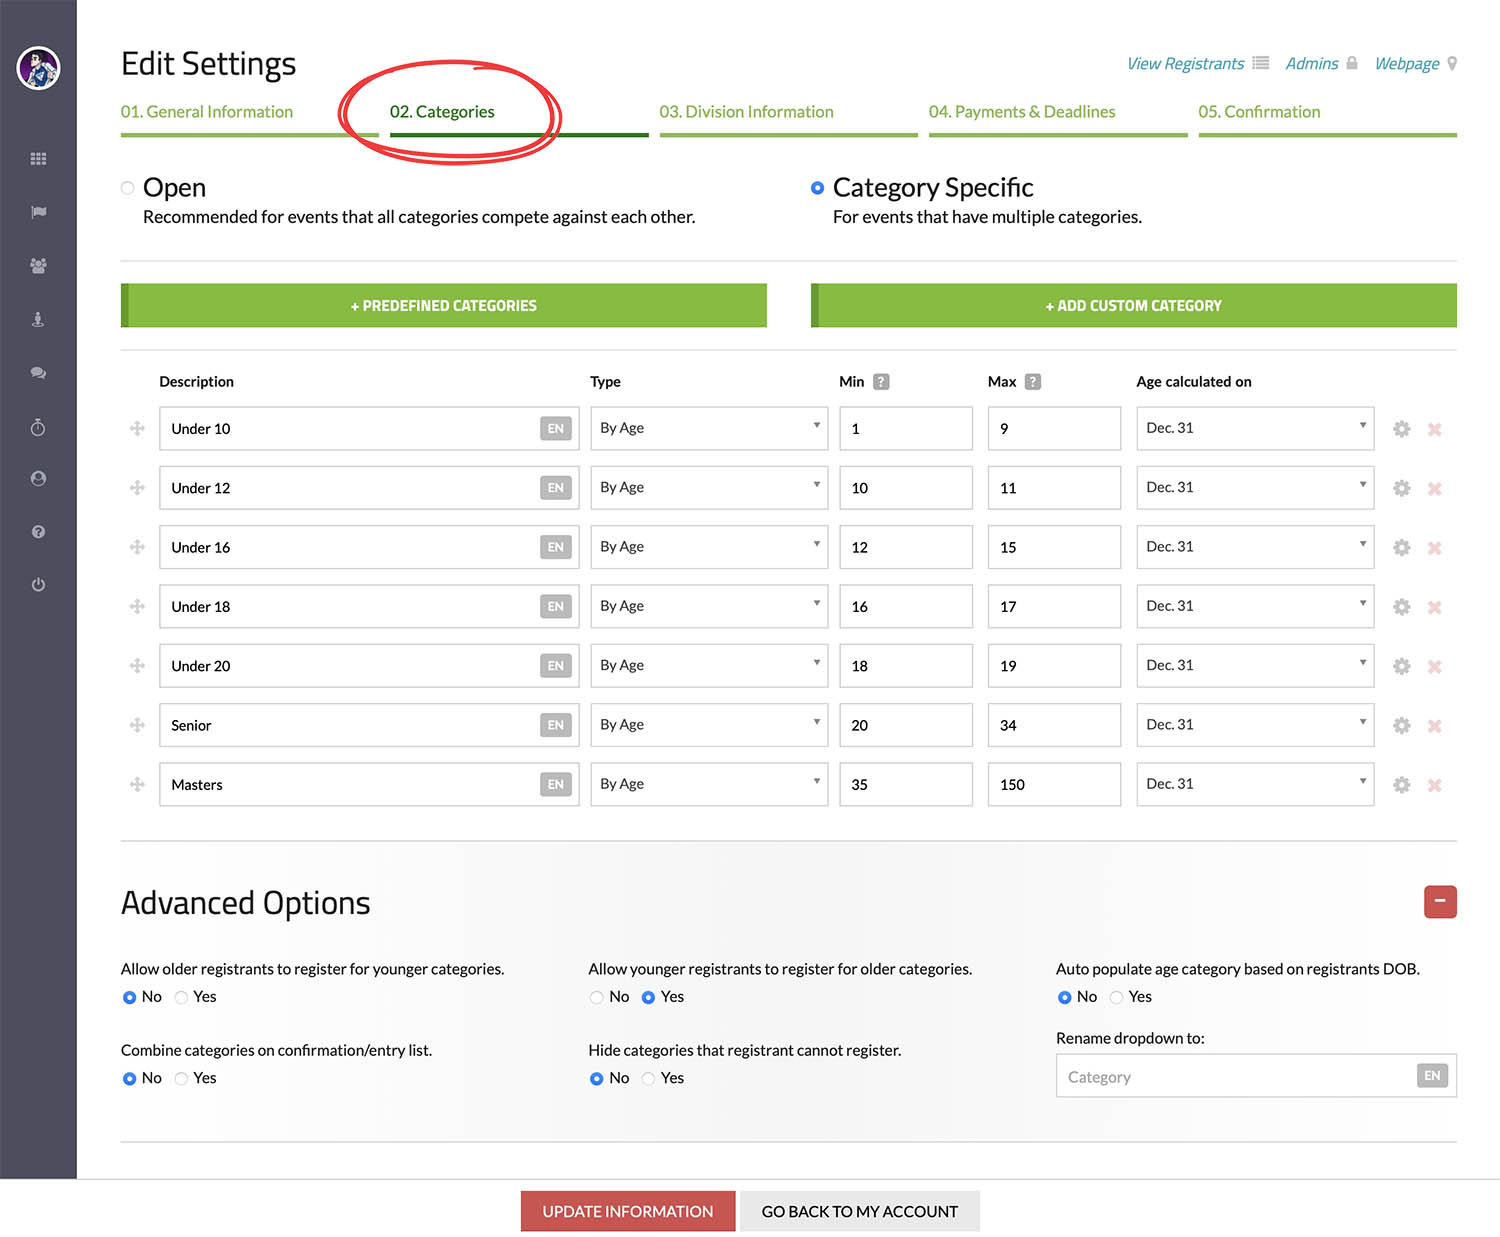
To access the settings for "Categories", you need to first create a registration form. You can find these settings under "Step 2: Categories".

Below is what the interface to manage your categories looks like.

 
Settings
Open

If you prefer not to set up separate categories, you can use the "Open" setting instead. This will hide the category drop-down menu on the registration form.

Category Specific

To set up separate categories, use the "Category Specific" option. This enables you to create multiple categories that registrants can choose from when registering.

+ Predefined Categories

You have the option to select categories from our predefined list of commonly used categories. Additionally, any past custom categories you created will also appear in this list.

+ Add Custom Category

To add your own custom categories, simply click on the "+ ADD CUSTOM CATEGORY" button and enter the desired settings as needed.

Ordering

You can easily arrange the order in which categories appear on the registration form by clicking and dragging the "4 arrow" icon located to the left of the category.

Description

This setting allows you to enter a description for your category.

Type

This setting enables you to specify whether the category is based on age or grade. If neither option applies, you can choose "By age" and leave the minimum and maximum age settings blank, which will allow any age to register for that category.

Min

This setting allows you to set the minimum age or grade requirement for the category, depending on the "Type" you have selected. For example, if "By age" you can enter "16" for a minimum age requirement of 16 years old. If there is no minimum requirement, you can either enter 0 or leave the field blank.

Max

This setting allows you to set the maximum age or grade requirement for the category, depending on the "Type" you have selected. If there is no maximum requirement, you can either leave the field blank or enter a value that all registrants will satisfy, such as 150.

Age calculated on

This setting allows you to specify when the registrants age should be calculated on. It has the following options:

  • Dec 31: The registrant's age will be calculated as of December 31st of the event date or club membership year.
  • Event date: The registrant's age will be calculated based on the date of the event.
  • Registration date: The registrant's age will be calculated based on the date they are registering for the event or club.
  • Custom date: You can select any date by using a date picker.
Additional Settings

To access additional settings, click on the "gear" icon to the right of the category. The available settings are as follows:

  • Disable this category: If you want to prevent future registrants from selecting a category without deleting it, you can disable the category.
  • Don't require this category to enter a DOB: If you want to allow a category to be selected without requiring the registrant to enter their date of birth, you can enable this option.
  • Division #: This field is utilized by programs such as HyTek Meet Manager or Meet Pro to link our system's categories to the categories set up in Hytek Meet Manager or Meet Pro. You can find more information about importing to Hytek Meet Manager or MeetPro in their respective sections.
Delete

You can use the delete icon to the right of each category to remove a category from your page. However, if you delete a category that already has registrations, it will not delete those who have already registered. It will simply no longer show up as an option for future registrants.

Advanced Options
Allow older registrants to register for younger categories.

This setting allows older registrants to register for categories intended for younger participants. For example, if you want to enable parents to register their children for a kids category.

Allow younger registrants to register for older categories.

This setting allows younger registrants to register for categories intended for older participants. For example, if you allow a 13-year-old to register for a 14-15 year old category.

Auto populate age category based on registrants DOB.

When enabled, this setting will automatically populate the category drop-down menu after a registrant enters their date of birth. This can be a useful feature, but be cautious if you have overlapping age categories set up. In such cases, the system will auto-populate the first category found that the registrant is eligible for.

Combine categories on confirmation/entry list.

When enabled, this setting allows you to set up different categories while having all registrants appear together on the confirmation list.

Hide categories that registrant cannot register.

Enabling this setting allows you to hide categories that a registrant is not eligible for, based on their age or other criteria. For instance, if an registrant is 35 years old, the system will automatically hide options for younger age categories. If this option is not enabled, the ineligible categories will still be visible but disabled.

Rename dropdown to:

This setting allows you to customize the label for the "Category" drop down menu to a name of your choice.


It's important to note that the categories in our system are not restricted to age requirements. You have the flexibility to rename the "Category" field to any label that best fits your needs. For example, in the screenshot below, we have renamed the categories as time slot.


Last updated: May 28th, 2023
 

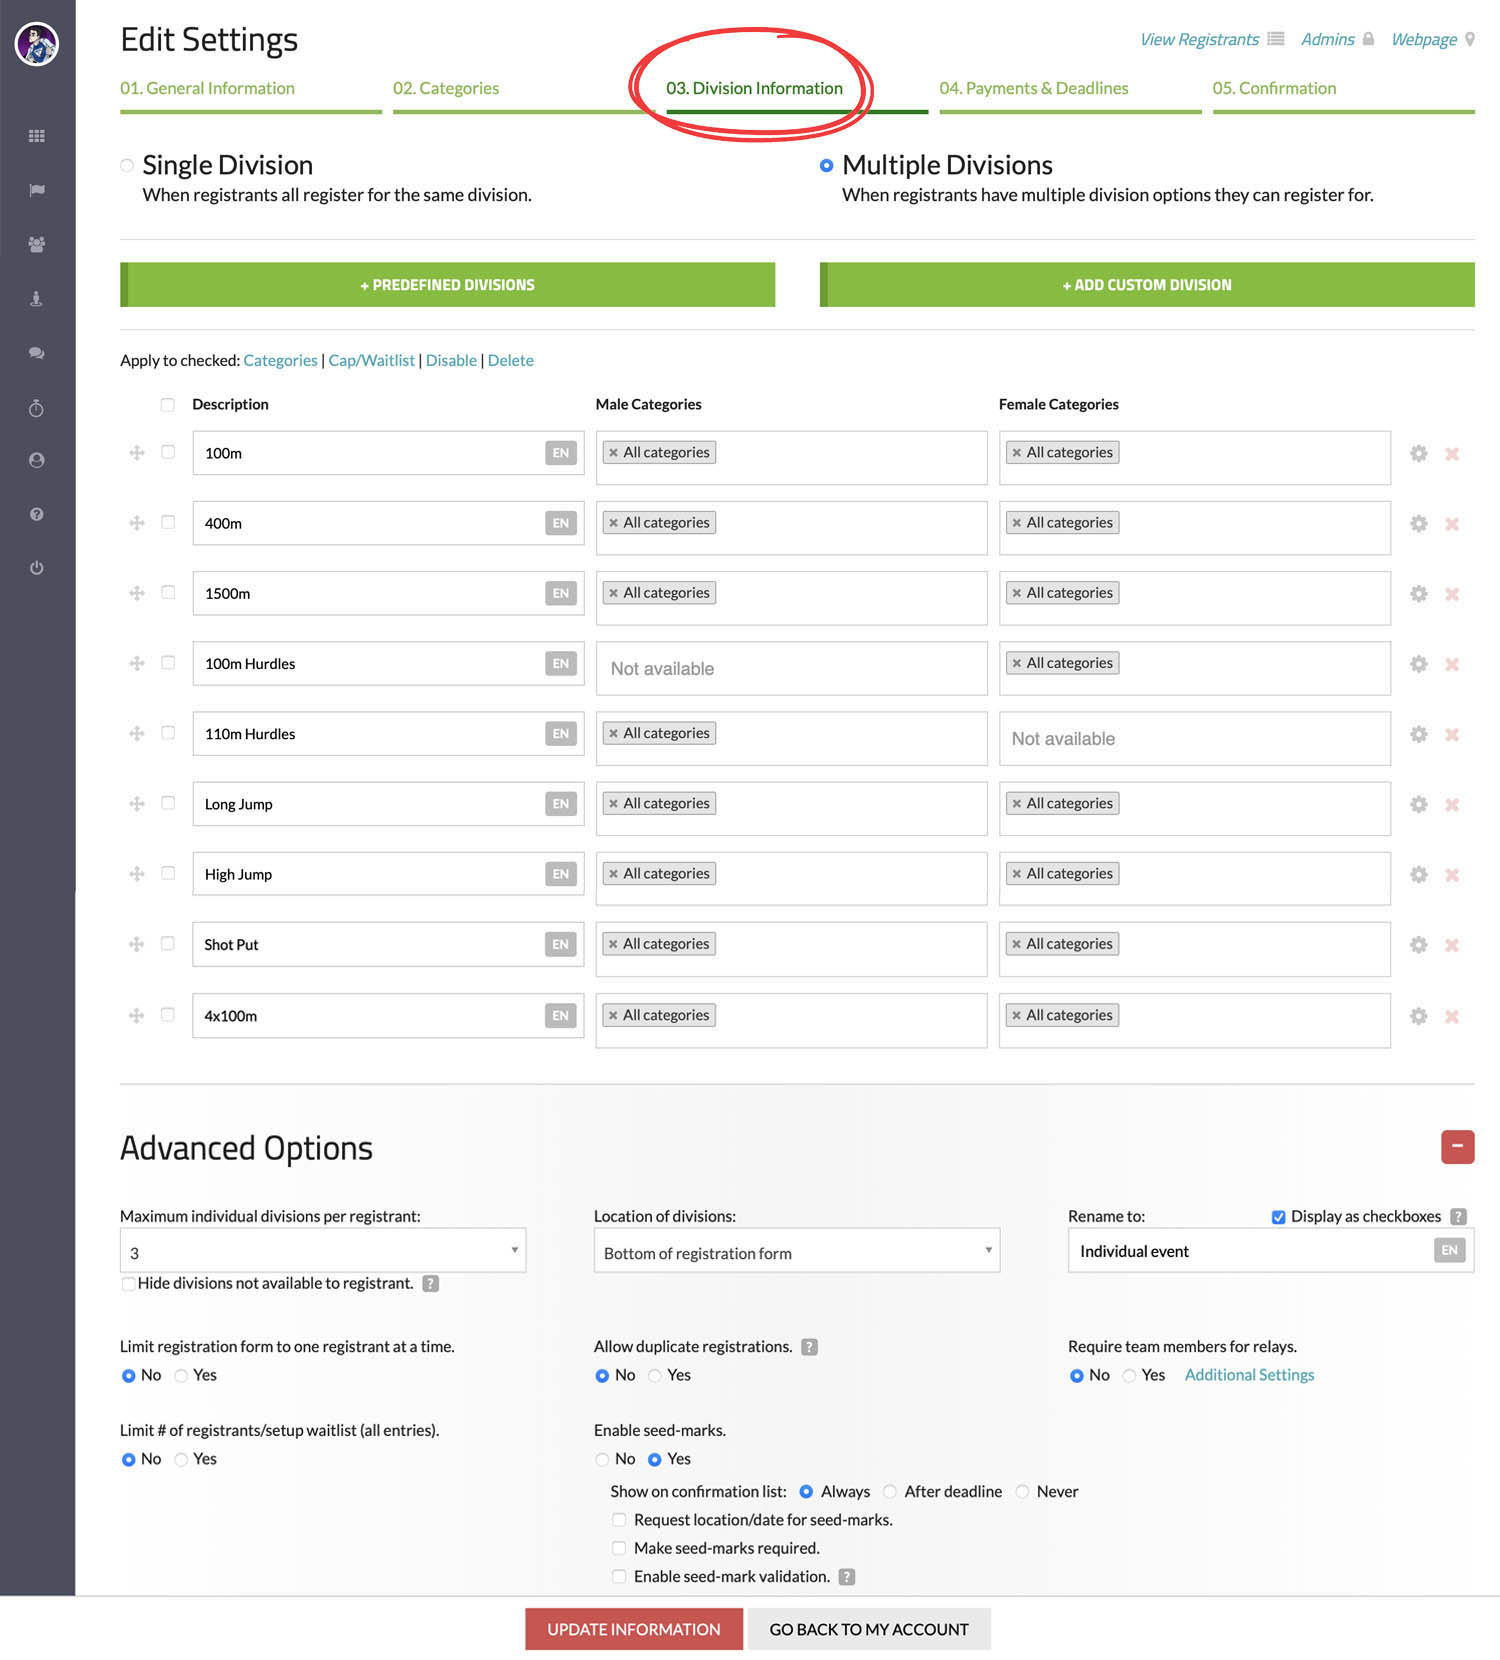
You have the option to establish multiple divisions or individual events/membership types based on your requirements. Our system enables you to personalize the names of these divisions, giving you the flexibility to use them in a way that aligns with your preferences.

To access the settings for "Divisions", you need to first create a registration form. You can find these settings under "Step 3: Division Information" (is labelled "Step 3: Membership Types" on membership pages).

Below is what the interface to manage your divisions looks like.

 
Settings
Single Division

If you prefer not to create multiple divisions, you can use this setting to simplify the registration process. Enabling this option will remove the division selection from the registration form.

Multiple Divisions

If you want to offer multiple divisions for registrants to choose from during registration, you can set up this setting.

+ Predefined Divisions

You have the option to select divisions from our predefined list of commonly used divisions. Additionally, any past custom divisions you created will also appear in this list.

+ Add Custom Division

To add your own custom divisions, simply click on the "+ ADD CUSTOM DIVISION" button and enter the desired settings as needed.

When creating a custom division, you can also specify the "Type". Depending on the type of event, you may see different options, as shown in the screenshots below.

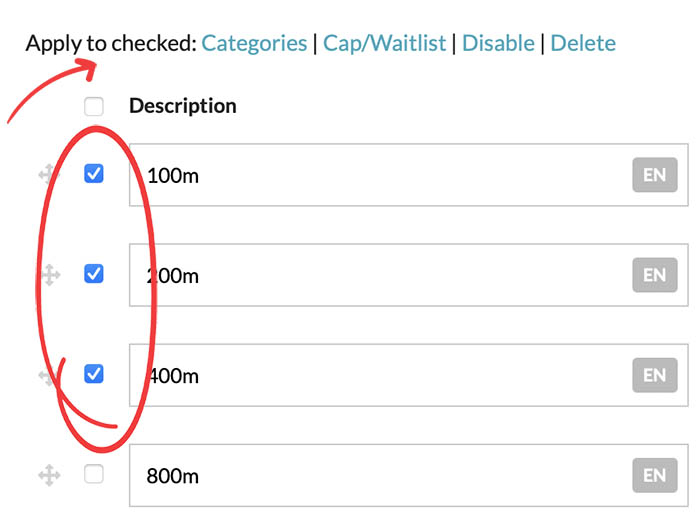
Apply to checked

This feature enables you to apply settings to multiple divisions simultaneously. By selecting each division you wish to configure and then clicking the link to the right of "Apply to checked," you can swiftly apply settings to all selected divisions.

Ordering

You can easily arrange the order in which divisions appear on the registration form by clicking and dragging the "4 arrow" icon located to the left of the division.

Description

This setting allows you to enter a description for your division.

Male Categories

This setting allows you to restrict a division to certain male categories (or prohibit registration for male participants).

Female Categories

This setting allows you to restrict a division to certain female categories (or prohibit registration for female participants).

Additional Settings

To access additional settings, click on the "gear" icon to the right of the division. The available settings are as follows:

General Settings

  • Disable this division: If you want to prevent future registrants from selecting a division without deleting it, you can disable the division.
  • Don't require this division to be for members only: If your event is exclusively open to "members only," but you also wish to make certain divisions accessible to non-members, you can utilize this feature.
  • Allow the following younger categories to register: If you wish to enable registration of certain younger categories for a division that is typically restricted to older participants, you can use this functionality.
  • If registered for "division name" then disable registration for: If you want to ensure that a registrant who signs up for a specific division cannot register for another specific division, you can utilize this setting.
  • Division Code: This field is utilized by programs such as HyTek Meet Manager or Meet Pro to link our system's divisions to the divisions set up in Hytek Meet Manager or Meet Pro.
  • Enable seasonal type: This feature enables you to establish seasonal divisions (typically utilized for membership types). Seasonal divisions can be configured to span a specified time period or a certain number of days/months/years after registration. With seasonal divisions, you can also automate the process of sending renewal notifications to each registrant prior to their expiration date.

    When configuring seasonal types, you have the option to choose between "Static Timeline" and "Dynamic Timeline." Here's how they differ:

    • Static Timeline: With this option, the start and end dates for the seasonal type are fixed and do not change regardless of when a registrant signs up. For example, if the seasonal type is set to run from January 1st to December 31st, all registrants who sign up for that type during that time period will have the same start and end dates.
    • Dynamic timeline: This option allows the start and end dates for the seasonal type to be based on the registrant's registration date. For example, if a seasonal type is configured to last for one year, the expiration date for each registrant will be 365 days after they register.

Cap/Waitlist

  • As this functionality is more comprehensive, it has its own section in the Knowledge Base where you can learn how it works.
Delete

You can use the delete icon to the right of each division to remove a division from your page. However, if you delete a division that already has registrations, it will not delete those who have already registered. It will simply no longer show up as an option for future registrants.

Advanced Options
Maximum individual divisions per registrant

With this setting, you can restrict individual registrants from registering for more than a predetermined number of divisions. For instance, if you organize a track & field meet that permits a maximum of three individual events per registrant, you can enforce this restriction using this setting.

Location of divisions

By default your divisions will be listed at the bottom of the registration form. However, this setting allows you to customize the location of your divisions on the registration form. For instance, if you prefer to have them at the top of the form or after a specific question, you can adjust their placement using this setting.

Rename to

This setting allows you to customize the label for the "Division" options to a description of your choice.

Display before category
/ Display after

If you setup categories under Step 2: Categories this setting allows you to decide whether the division drop down appear before or after the category drop down.
This setting is not available when using "Display as checkboxes".

Display as checkboxes

This setting enables you to change the format of the drop-down menu to checkboxes, which is often a more user-friendly format for registrations that allow multiple division entries, such as a track & field meet.

Limit registration form to one registrant at a time

By default, the registration form allows multiple registrants to be registered simultaneously, such as when a family registers five people or a coach registers 25 athletes. However, if you prefer to restrict your registration form to allow only one registrant at a time, you can utilize this setting to enforce that rule.

Allow duplicate registrations

By default, the system automatically checks for duplicate registrations, which occur when someone shares the same name, date of birth, and division entry (for seasonal membership, only active members are included). However, if you want to allow duplicate registrations, you can enable this setting.

Require team members for relays

If you have any "relay" type divisions added there are some addition settings you can utilize. This setting allows you to require registrants to add relay team members or not. There is also an "Additional Settings" link which has the following settings:

  • # of team members: You can set the minimum and maximum number of team members using this setting.
  • Allow mixed teams: If you want to allow the registration of both males and females on the same teams.
  • Allow team alternates: If you want to allow registrants to enter alternate members who may replace the original team members.
  • Rename to: You can use this feature to rename the term "Relay". For instance, in Karate, you could use the term "Team Kata" to describe similar division types.

Limit # of registrants/setup waitlist (all entries)

This feature enables you to set registration limits. For instance, if you set a limit of 1000 participants, registration will only be available to the first 1000 registrants. Additionally, you can activate a waitlist if desired. As this functionality is more complex, it has its own section in the Knowledge Base where you can learn how to use it.

Enable seed-marks

You can gather seed-mark information from registrants during the registration process using this setting. This feature is primarily intended for events such as track and field, swimming, and similar sports. When activated, the following settings are available:

  • Show on confirmation list: If you have activated a public confirmation list, you can choose to display the seed marks on it using this option.
  • Request location/date for seed-marks: If you want to gather additional information about the location and date when the seed-mark was obtained.
  • Make seed-marks required: If you want to make it required that registrants provide a seed-mark during the registration process.
  • Enable seed-mark validation: As this functionality is more complex, it has its own section in the Knowledge Base where you can learn how to use it.


It's important to note that the divisions in our system are very flexibility and you can rename the "Division" label to what best fits your needs. It is not restricted to examples we provide above.


Last updated: May 28th, 2023
 

You have the option to set multiple deadlines and customize the pricing for your registration form to a great extent.

To access the settings for "Payments & Deadlines", you need to first create a registration form. You can find these settings under "Step 4: Payments & Deadlines". There are many settings, but we will review each one in detail below.

 
Settings
No entry deadline (registration always opened)

With this setting, you can eliminate any constraints on registration time limits. It comes in handy for registrations that run continuously throughout the year, such as a "year-round" event or club that accepts registrations regardless of the date.

No charges for registration (free event)

If your event or club does not charge any registration fees, you can easily set it up as a free registration page. By enabling this option, all pricing options will be removed.

Open registration on a specific date.

You can use this setting if you wish to open your registration on a specific date.

Deadlines

The system enables you to set up multiple entry deadlines, which can be beneficial if you want to incentivize early registrations by offering discounted fees, or discourage late registrations by increasing fees. You have the ability to activate an "Early Bird Deadline", "Regular Deadline", and "Late Deadline". However, you can also include additional deadlines by selecting the "+ Add Another Deadline" link. Please keep in mind that you can customize the names of these deadlines as required (e.g., you could rename "Early Bird Deadline" to "Early Discounted Booking").

Default Price

This price field can be utilized for straightforward registration pricing if you have a standard fee for each registrant. This price can also be customized to:

  • Per registrant: Regardless of the number of individual entries/divisions that a registrant signs up for, they will only be charged a single fee. For example, if the price is set at $10.00 and a registrant registers for the 100m, 200m, and Long Jump events, they will only be charged $10.00.
  • Per entry: The registrant will be charged this fee for every individual entry/division they sign up for. For instance, if the price is set at $10.00 and a registrant registers for the 100m, 200m, and Long Jump events, they will be charged $30.00 in total.
  • Per day: Upon activation, the system includes a field that requests the number of days the registrant will be participating. For instance if the price is set at $10.00 and they are participating for 3 days, they will be charged a total of $30.00.
  • Per order: Regardless of the number of registrants or individual entries/divisions, they will all be charged the same fee. For example, if the price is set at $100.00 and a coach registers 20 participants, the total charge will be $100.00.
Custom Price(s)

Our system provides you the ability to create very simple or complex pricing for your event or club. Since this functionality is more extensive, it has its own section in the Knowledge Base.

Manage Promotions

This feature enables you to generate promotion codes, offer discounts to registrants belonging to specific teams, or provide discounts based on the total number of entries. Since this functionality is more extensive, it has its own section in the Knowledge Base, where you can obtain a detailed understanding of its workings.

Manage Discounts for Specific Registrants

With this setting, you can offer customized pricing for a designated list of registrants. As this functionality is more comprehensive, it has its own section in the Knowledge Base where you can learn how it works.

Processing fee

When collecting payments online our system charges a processing fee. The processing fee may be incurred by the registrant or covered by the event/club.

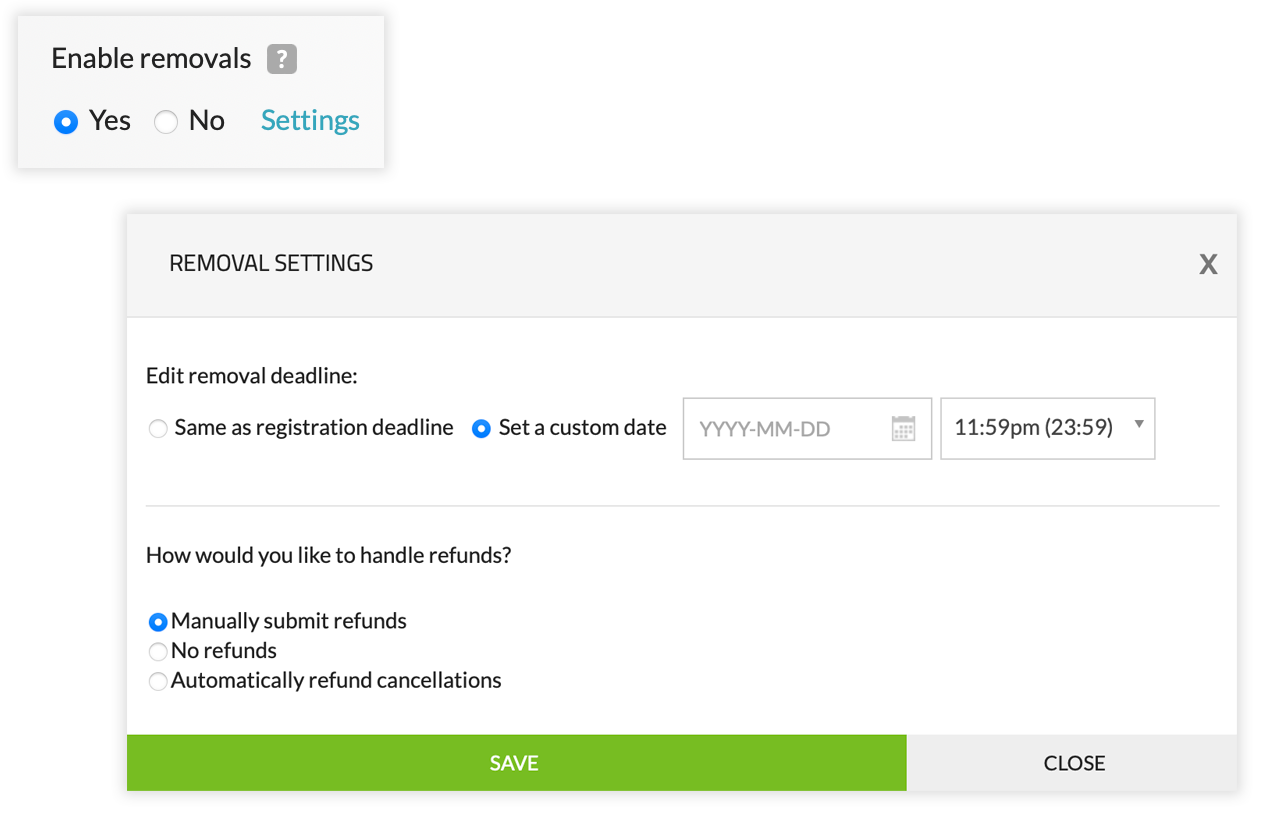
How would you like to handle refunds

This setting lets you choose how to handle refunds. Options include:

  • Manually submit refunds: Submitting refunds is limited to administrators only. Learn more about how you can submit refunds.
  • No refunds: If this option is chosen, the admin can still issue refunds, but the registration process will include a description informing registrants that no refunds are offered.
  • Automatically refund cancellations: If this option is enabled, and a registrant cancels their registration (if cancellations are allowed), the system will automatically initiate a refund for their registration.

Note that this option can be changed manually at any time. For instance, if you wish to set the system to automatically refund cancellations until a certain date, you can do so and then turn off the option on that date.

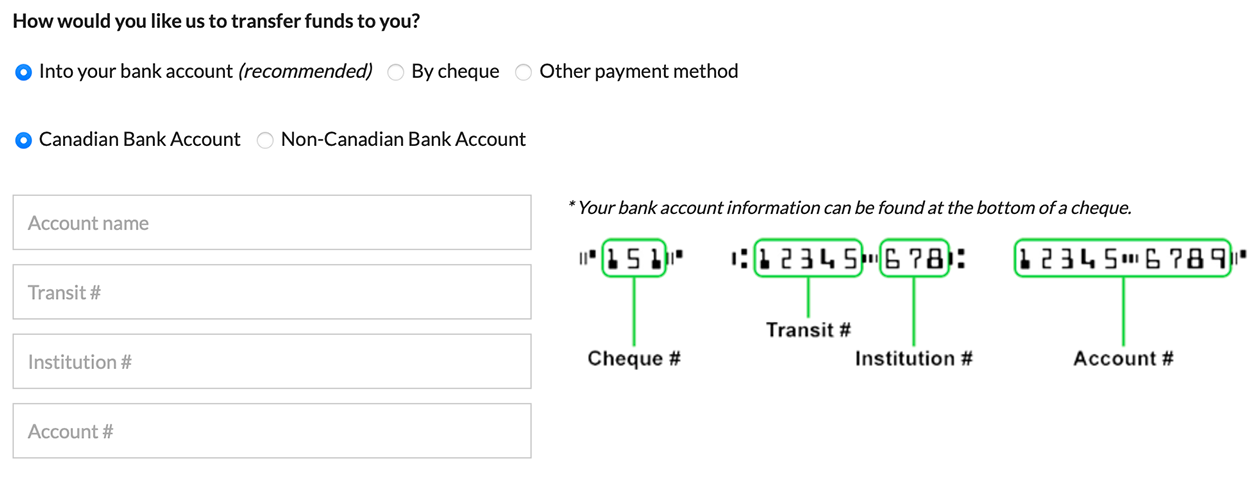
How would you like us to transfer funds to you

Currently, you have the following options available:

  • Into your bank account (recommended): We recommend this option as it allows you to deposit funds into your account anytime (available for most countries).
  • By cheque: If necessary, we can send a cheque to your organization via mail (available in Canada only).
  • Other payment method: If you would like to use a different funding method, such as an eTransfer.
Advanced Options
Timezone

This feature enables you to select the timezone on which registration deadlines will be based.

Allow extra registration time after deadline

By default, we provide registrants who are already on your registration form before the deadline with a grace period to complete their registration. However, you can modify this setting as needed.

Currency

Currently, we offer payment collection capabilities in CAD $, USD $, EUR €, GBP £, and AUD $. If you would like to process payments in a different currency, please contact us at [email protected].

Edit entry deadline

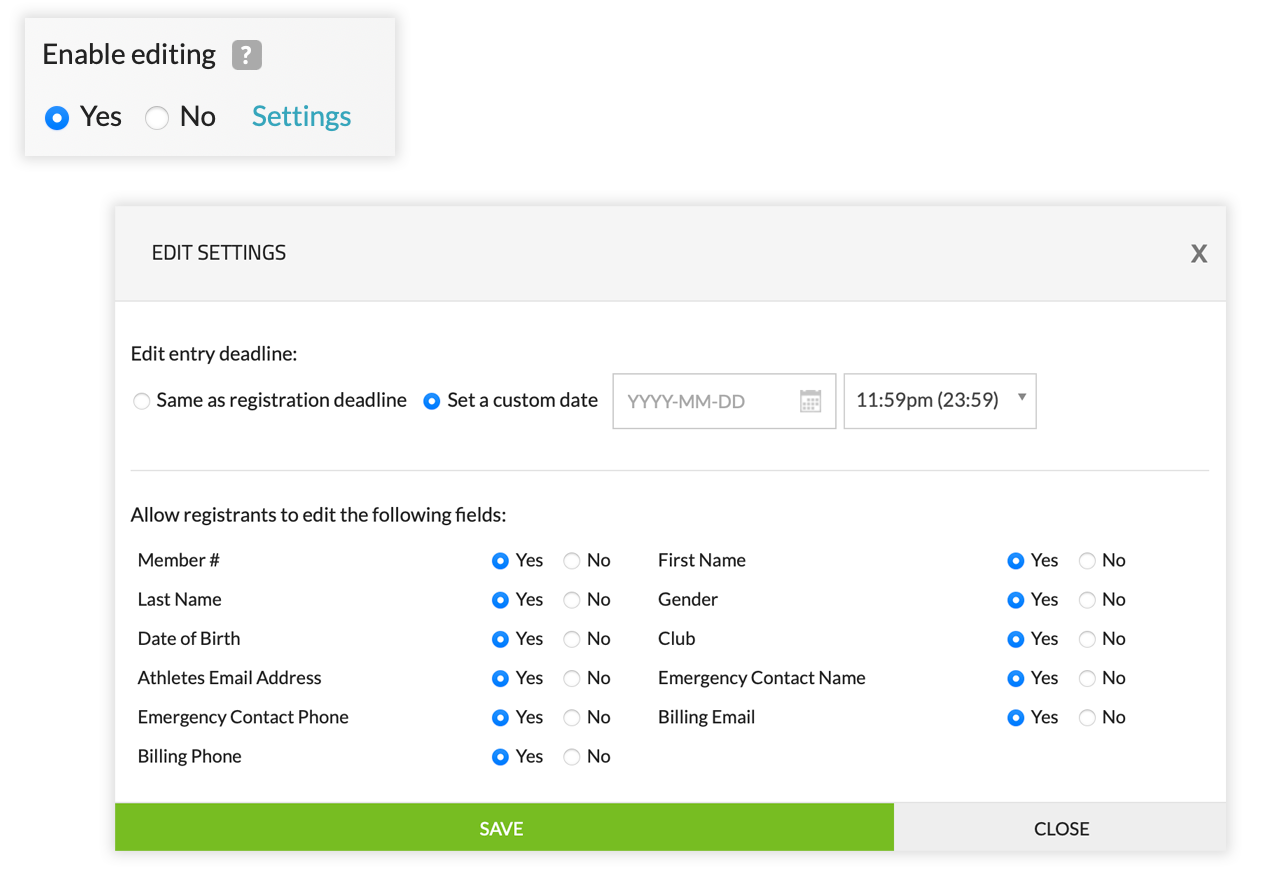
If you allow registrants the ability to edit their registration data, the default deadline for edits is the same as the registration deadline. This feature allows you to adjust the edit entry deadline if needed (e.g. if you want to restrict edits before or after the registration deadline).

Non-member fee

With this feature, you can apply an extra fee for non-members. To use this option, you need to have the "Member #" field added in Manage Questions. You can use the "Apply to" drop-down to specify which categories and/or divisions this fee will apply to.

Add extra fees

Our system allows you to add extra fees on top of your regular registration costs. For instance, you might want to include a "volunteer fee" of $5.00 per registrant to cover expenses like volunteer lunches. You have the flexibility to rename these additional fees as needed. You can use the "Apply to" drop-down to specify which categories and/or divisions this fee will apply to.

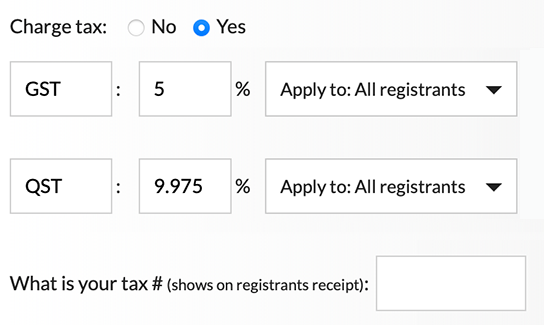
Charge tax

If you need to apply tax on top of your registration fees, our system allows you to do so. For instance, in Quebec, you could configure the system to add 5% GST and 9.975% QST to the registration fees. You can customize the tax names as required and include your tax number, which will appear on the registrants' receipts. You can use the "Apply to" drop-down to specify which categories and/or divisions this fee will apply to.

Team cap

The team cap feature allows you to set a limit on the number of participants or total dollar amount per team. Here are the options available:

  • Cap amount: This is the total amount of the cap. It can be set in dollars or the number of participants.
  • $ Amount / # of participants: This option allows you to choose whether the cap should be based on the total dollar amount or the total number of participants.
  • Separate by gender: When this option is checked, there will be a separate team cap for men and women on the same team.
  • Restrict to certain teams: This feature enables you to limit the team cap to certain teams only. It can be useful, for example, at a university/open meet that has a team cap for university teams only.
  • Apply to: This setting is only available when "$ amount" is selected. It allows you to specify which fees count towards the total. For instance, if you have added a T-shirt for sale on top of the registration costs, but you don't want those T-shirt purchases to count towards the team cap.
  • Disable entries after cap / Free entries after cap: This feature is only available when "# of participants" is selected. It allows you to either give free entries to the team after they hit their cap or disallow them from registering more than a certain number of participants.


Last updated: May 28th, 2023
 

Many events and clubs involve complex pricing structures. With our system, you have the flexibility to incorporate custom prices to meet your needs. To access the settings to add custom prices, you need to first create a registration form. You can find the settings for custom prices under "Step 4: Payments & Deadlines".

To add a custom price you can click the "+ Add Custom Price" under the respective deadline. You can create as many custom prices as needed. For instance, in the image below, there are three custom prices setup for the Early Bird Deadline, and three for the Regular Deadline.

You have the ability to choose between 5 types:

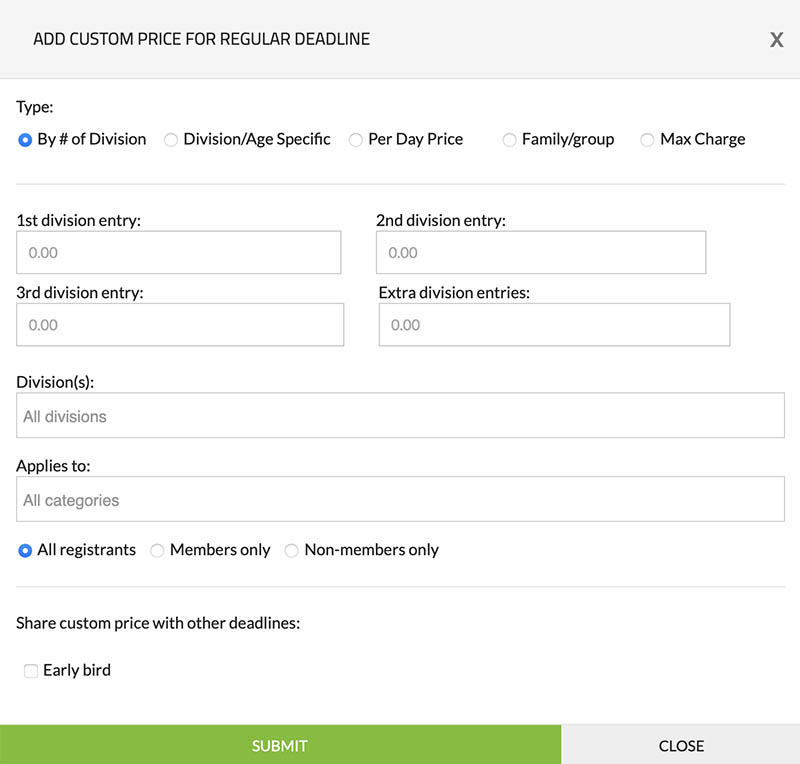
  1. By # of Division: Using this option, you can specify the cost that a participant will be charged when they register for one or more individual divisions/events/membership types. For instance, suppose you set $15.00 for the 1st division, $10.00 for the 2nd division, and $5.00 for the 3rd division, and a participant registers for the 100m, 200m, and Long Jump. In that case, they will be charged $15.00 for the 100m, $10.00 for the 200m, and $5.00 for the Long Jump, totaling $30.00.
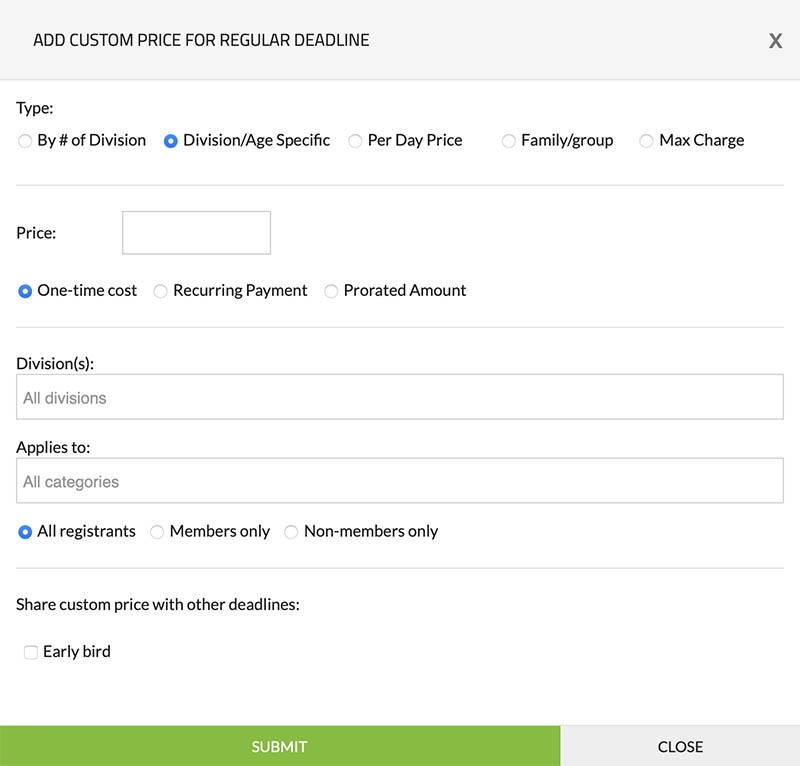
  2. Division/Age Specific: This option allows you to establish customized pricing for particular categories and/or divisions. For example, you may choose to charge $30.00 for Decathlon and Heptathlon entries.
  3. Per Day Price: With this option, you can establish a price per day for participation.
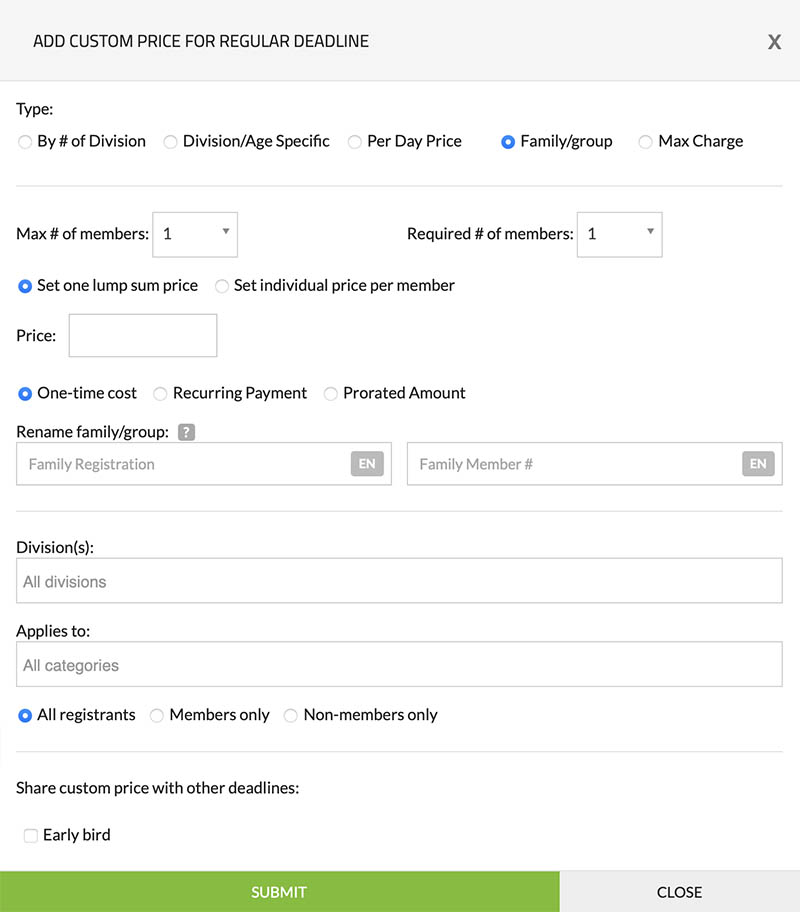
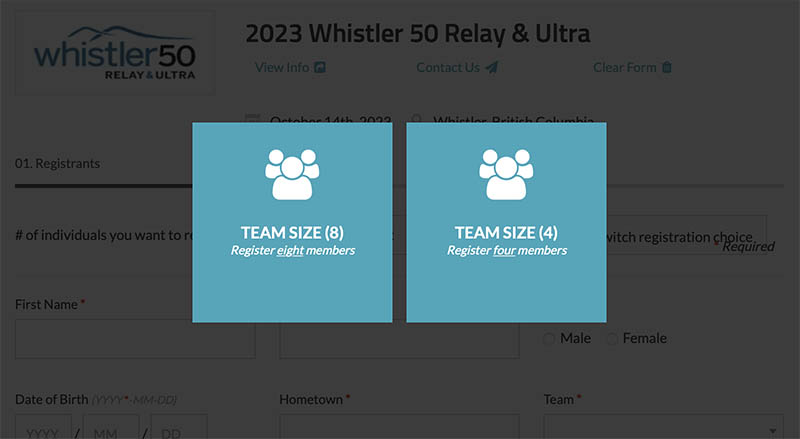
  4. Family/group: This option enables you to configure pricing for groups, such as a family of four.
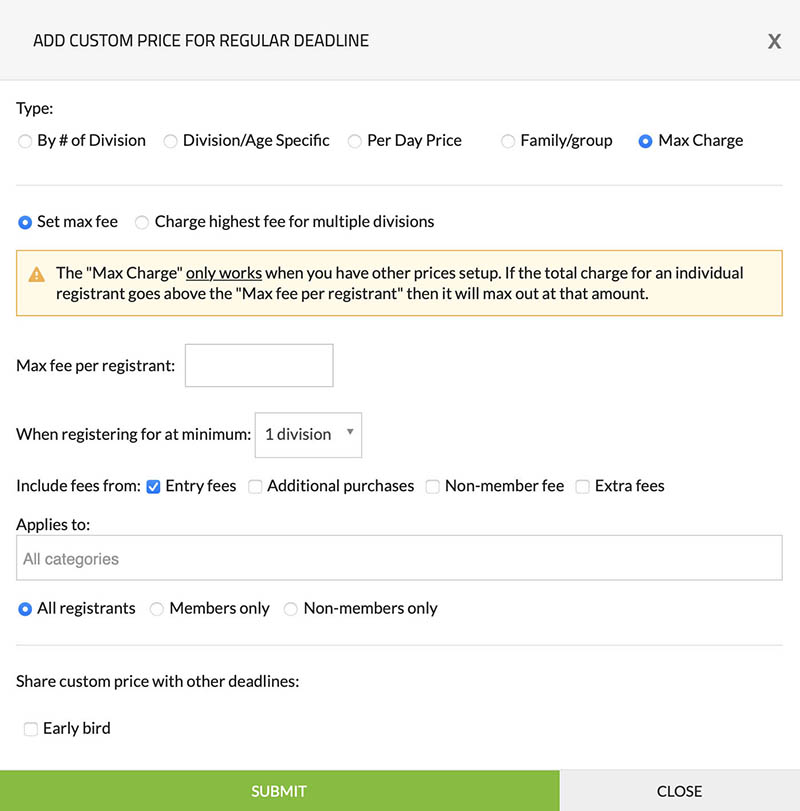
  5. Max Charge: With this option, you can establish a maximum fee that will be charged to each registrant.

Below is a more detailed explanation of each type.

(+) Learn more - By # of Division
(+) Learn more - Division/Age Specific
(+) Learn more - Per Day Price
(+) Learn more - Family/Group
(+) Learn more - Max Charge
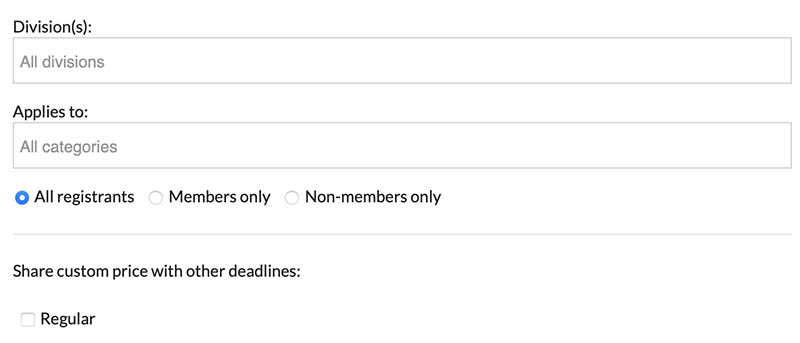
(+) Learn more - Shared settings (between multiple types)


Last updated: May 28th, 2023